Mostrando entradas con la etiqueta Vista. Mostrar todas las entradas

Fixing the “nVidia Control Panel gone”, the “System has not been modified” issue, and other nVidia drivers installation problems

Today, coming from nowhere, my nVidia control panel stopped working. It is not the first time that happens to me, so I did not worry so much. Things got worse when I rebooted the machine, and saw that my Windows lost the entire nVidia Display Driver. The strange thing was that it didn´t switch back to the VGA adapter. Instead, in the adapter settings you could just read: “Plug&Play monitor in “ and a very scaring whitespace behind. Things got even worse when I saw that, no matter which version I tried, the nVidia display drivers refused to re-install again.

Honestly, I saw myself re-installling windows (something I haven´t done in a long time, I must admit), but as one grows older, accumulates more and more “essential” applications that would take ages to re-install. And now I simply didn´t have the time, so I started investigating. It has taken me the whole afternoon and evening, so hope it helps someone else as well…

Things I tried

Reading forums and forums, I think I tried everything:

  • Change the regional settings before trying to install, as it seems some drivers presented issues with non-U.S. regional settings
  • Uninstall all nVidia drivers, reboot in safe mode, and install the new ones there
  • Use driver cleaner applications, like Driver Sweeper (from Guru3D) or Driver Cleaner Pro, to check if I had wrong, partial installations which refused to remove. Be careful with this kind of applications however. It´s pretty easy that they screw up your PC.
  • I tried switching back to the most recent Restoring Point, but the effects appeared again.
  • And many others…

All of them with no luck.

What was finally the cause of all evil

In one of the previous steps trying, I noticed that one of the nVidia applications installed (the nVidia PhysX Plugin for MAX), refused to un-install using the standard method. Luckily, it gave a bit more of information: “Access denied trying to access the key HKLM\Software\NVIDIA Corporation\PhysXPluginsForMax”. That caught my attention, as it was obvious that there was a problem with the registry.

Opening Regedit.exe, and navigating to that key, I realized that was not the only nVidia registry key with “Denied Access” problems. You just couldn´t read or modify the contents of keys like: “Global”, “Installers”, or “PhysXPluginsForMax” itself. The only thing you could do with those keys was seeing their security permissions.

The funny thing was that when selecting “Permissions”, you could see a message like the following:

image

Translation: “You don’t have permissions to read the actual permissions of key “XXX”, but you can make changes in the permissions”. Apart from the fact that seems a tongue twister, it seems a joke. You cannot read your permissions but you can write them? May be it’s a translation bug in the Spanish version of Windows Vista, because you actually can see the permissions, but cannot change them (much more logical).

After opening the window, you will find something like this:

image

The main problem here is that the box with the label “Names of groups or users” is empty. It means that no-one can actually access this key, and that´s why the Control Panel and the Display Drivers installers are failing.

Note: If this also happens to you, you would worry about what is happening in your system, as having that keys this way is a serious security problem, as any user could get control of them. Please read the conclusions chapter, about what can lead to this situation

Other Symptoms that could lead to the same cause

  • nVidia control panel gone
  • nVidia display driver gone
  • Some nVidia applications refused to un-install
  • nVidia display drivers refusing to install
  • Some nVidia applications refusing to install
  • nVidia display drivers showing the message: “The system was not modified”
  • Others.

How to fix it

Obviously, the way to fix it is just re-assign users permissions to those keys. But how to do that if you don´t have permissions to change the permissions?

Thankfully, one day God thought it was a good idea to create Mark Russinovich and David A. Solomon, the two genius behind SysInternals. Mark also created PS Tools, a suite of tools that help managing Windows. One of the small apps distributed with PSTools is PsExec, which can run processes remotely, and is able to run them inside the SYSTEM account, instead of the current user. And that’s the key to be able to change the registry in this circumstances.

So:

  1. Download PSTools
  2. Run the Command Prompt in Administrator mode (Start->Programs->Accesories->Command Prompt with the right button->Run as Administrator)
  3. Navigate to the folder where you downloaded PSTools
  4. Run the RegEdit process from the SYSTEM account, and allowing it interact with the windows desktop, typing:

“psexec –s –i regedit.exe”

Regedit will open, but this time from the SYSTEM account, where you should be able to change those keys permissions. Now:

  1. Go to each key you want to change (do this at least for all nVidia keys), adding where necessary the usual users or groups to each key: your own user, SYSTEM itself, Administrators, etc.
  2. Grant to those users permissions to read and write in those keys
  3. Close RegEdit.
Now, you should be able to un-install and re-install everything again, and your drivers won´t complain anymore.
 

Conclusions

 
As I mentioned, having those keys with no users is a serious security problem. But, who is responsible for leaving them like that? A virus? I honestly don´t know, and I´m going to investigate it.
 
In my case, I think it is more due to a too dirty computer than a virus. But who knows! If anyone of you can give me a hand with this, it would be much appreciated.
 
Cheers!

Parallel computing and processor affinity. Never underestimate the Windows Vista Scheduler

[Traducido al Español por Matías Cordero. Puedes leer la versión en Castellano aqui]
Everyone knows that parallelization is a hard but important issue, as it seems that it´s not affordable anymore to increase CPU clock speeds. The future is multi-core! So you should start getting familiar with System.Threading a.s.a.p. ;)
Determine the appropriate balance
When one identifies a parallelizable task, it´s always hard to find the appropriate balance for parallelization. Is it better to open more threads or is it better to give more work to each thread? The answer to that question of course depends on many things, and remarkably on the nature of the task each thread will handle.
It is important to guess the amount of time that task will idle in each thread. If it´s an intensive task, then better start less threads with more work each. If it´s just the opposite (a task that will frequently idle waiting for something -IO, graphics, whatever-), then better open more threads with less work, as they will scheduled through the physical cores of your machine when one is idling. Of course, never open less threads than your machines physical cores!
What´s the objective? The same as in hotels… 100% occupancy.
An easy way to determine the nature of our task is to let it run on a single CPU, and see the Task Manager CPU usage history graph. This will give you an idea of the CPU usage your process made. You will ask now how to force your application to run in a specific CPU. The answer is Processor Affinity (see below).


To loose, or not to loose control. That´s the question…
When one starts dealing with parallelization, the first idea is to split processes through the CPUs oneself. Why not? If you have 10.000 operations, then open four threads with 25.000 operations each. First for CPU0, second for CPU1 and so on… I´d feel very comfortable with this idea. Neat and clean, and everything under control, right? Well, it´s not always that simple.
In an ideal world, a single task that is not going to be parallelized anymore and that lives alone (not with the dozens of neighbors a process has in a modern OS), is better handled by a single CPU, as this will increment cache hits and eliminates any thread switching infrastructure overhead. But in real life, processes are interrupted by OS operations, IO, other processes and many other things. A multi-core machine is perfect for handling all that interruptions, as it can spread them all through the existing cores, but if we all start fixing our applications to specific CPUs, the capacity of the OS to avoid locks and waits is heavily reduced.
As this great article explains, most of the times, it is much better to rely onto the Operating System so it can put each thread wherever he wants. However, we´ll see some results regarding this decision later.


Processor affinity of a process

In Windows, you can force a process to run in a specific CPU just using the Task Manager (right click your process and select “Set Affinity”) or programmatically using the System.Diagnostics namespace. The following line will change current process affinity to CPU 1:
System.Diagnostics.Process.GetCurrentProcess().ProcessorAffinity = (System.IntPtr)1;
The ProcessorAffinity property is a bit mask variable. So, the values are:
Value Allowed processors
0 (0000) Not allowed (that would mean use no processors)
1 (0001) Use processor 1
2 (0010) Use processor 2
3 (0011) Use both processors 1 and 2
4 (0100) Use processor 3
5 (0101) Use both processors 1 and 3
6 (0110) Use both processors 2 and 3
7 (0111) Use processors 1,2 and 3
8 (1000) Use processor 4
and so on…  
Please note that this will change the affinity of the current process (your entire application), not of the current thread. Any thread opened from this process will inherit the same affinity.

Processor affinity of a thread

A first requirement in order to control how your threads are distributed through CPUs is to be able to set a thread´s affinity (not a process). There is an interesting post about this issue here, where Tamir Khason explains the whole thing. To change a thread´s affinity we must use the System.Diagnostics.ProcessThread class (ProcessAffinity property). The problem comes when one tries to find out which thread is the one we are looking for, in the list of the current process´ threads.

First Approach - Deprecated

We get the ProcessThread instance with the following code:
ProcessThread t = Process.GetCurrentProcess().Threads.OfType<ProcessThread>().Single(pt => pt.Id == AppDomain.GetCurrentThreadId());
t.ProcessorAffinity = (IntPtr)(int)cpuID;
The problem with this approach is that the method GetCurrentThreadId is deprecated, so better you don´t use it.

Second approach – Not valid

You could be tempted to use the ManagedThreadID to search inside the Threads collection of your process. Don´t do it. ProcessThread.ID has nothing to do with the ManagedThreadID property, they represent different things. A guy says here that ManagedThreadID is in fact the offset inside the ProcessThread collection, but I didn´t investigate any further, and I wouldn´t advise you to do so unless you verify this information

Third approach – Valid but unmanaged

The third approach will “dllimport” kernel32.dll and use some of it´s functions. This method is tested and works correctly. Here we go:
[DllImport("kernel32.dll")] 
static extern IntPtr GetCurrentThread();
[DllImport("kernel32.dll")] 
static extern IntPtr SetThreadAffinityMask(IntPtr hThread, IntPtr dwThreadAffinityMask);
SetThreadAffinityMask(GetCurrentThread(), new IntPtr(1 << (int)cpuID));
A curious note:
If you are programming for the XBox360 with the XNA Game Studio 3.0, you have a Thread.SetProcessorAffinity method ready for you, without all the garbage above. This is just because the XBox specially needs to take advantage of its cores to give a decent performance. I don´t know if the presence of this method is due to a worse performance of the XBox Scheduler than in Vista… may be. However you can read further here.


The Tests

Task: Generation of three 2D tables of information as a result of a geometric test in a 3D scene, involving 975.065 collision tests (ray-mesh) each
Hardware: Dell XPS 630 QuadCore
Monitoring software: Process Explorer

PART 1 (multithreading disabled). Impact of processor affinity

Test 1:
  • Number of threads: 1 (main thread)
  • Processor affinity: CPU 1
  • Total time: 2 min 57.11 secs
image
With processor affinity enabled to CPU 1, all the work is obviously handled by this CPU. The two peaks you can appreciate in the graph are due to a IO operation (saving data to disk) and clearly demarcate the generation of each table of data. In this test we can clearly appreciate that our task is very intensive and constant, as keeps the processor at a 100% usage almost all the time.
Test 2:
  • Number of threads: 1 (main thread)
  • Processor affinity: None (any processor)
  • Total Time: 2 min 29.45 secs
image
Most of the work was handled by CPU 2 but the rest of cores also worked on the process (checked in Process Explorer that all the green lines belonged to the process being measured). It is clear that forcing the thread to work in CPU 1 only introduced locks and waiting periods probably due to interruptions coming from other programs that needed CPU 1 too.
Winner of part 1 ………  Windows Scheduler !

PART 2 (multithreading enabled 1)

Test 1:
  • Number of threads: 2 (main thread + 1 calculation thread)
  • Processor affinity:
    • Main thread: Any
    • Calculation thread: CPU 1
  • Total time: 2 min 18.14 secs
image
The results we are getting here are quite logical. The main change in this test is that we are separating the calculation from UI update and IO saving to disk. You can appreciate the low peaks in the first graph and their equivalent in cores 2 and 3 (where the saving operation is placed). It is very interesting to note that separating the saving operation to different cores doesn´t save any time, because we wait for it to complete before continuing with the next table of data. That´s why now the low peaks in the first graph are much more noticeable. We have moved some computing from one core to another, but not parallelized anything.
However, we get a small performance improvement, mostly because now the UI update (which involves some Bitmap manipulation) is now done at cores 2 and 3
Test 2:
  • Number of threads: 2 (Main thread + 1 calculation thread)
  • Processor affinity: None
  • Total time: 2 min 14.86 secs
image
This time, we can again appreciate that work has been scattered through all cores, with a more remarkable presence of CPU 2. Again, the Windows scheduler wins the race.
Winner of part 2 ………  Windows Scheduler !

PART 3 (multithreading enabled 2)  

Test 1:
  • Number of threads: 3 (main thread + 2 calculation threads)
  • Processor affinity:
    • Main thread: Any
    • Calculation threads: CPUs 1 and 2
  • Total time: 1 min 18.66 secs
image
We start to see a big performance improvement here. Twice the computing power, almost twice faster. That seems quite realistic.
Test 2:
  • Number of threads: 3 (main thread + 2 calculation threads)
  • Processor affinity: None
  • Total time: 1 min 16.59 secs
image
Another win for the Windows Scheduler. Obviously when the total time gets shorter, the differences too, but the OS still wins.
Winner of part 3 ………  Windows Scheduler !

PART 4 (multithreading enabled 3)
Test 1:
  • Number of threads: 5 (main thread + 4 calculation thread)
  • Processor affinity:
    • Main thread: Any
    • Calculation threads: CPUs 1, 2, 3 and 4
  • Total time: 41.76 secs
image
Now comes the huge performance improvement. With 4 calculating threads, the total time gets reduced to 41 secs!. Let´s see how the OS performs with 5 threads.
Test 2:
  • Number of threads: 5 (main thread + 4 calculation thread)
  • Processor affinity: None
  • Total time: 42.05 secs
image
Wow… That was too close! This time we must mark the OS as looser.
Winner of part 4 ………  Processor Affinity! (it was close)

PART 5 (multithreading enabled 4)
Test 1:
  • Number of threads: 9 (main thread + 8 calculation threads)
  • Processor affinity:
    • Main thread: Any
    • Calculation threads 1..4: CPUs 1..4
    • Calculation threads 5..8: CPUs 1..4
  • Total time: 41.07 secs
 image
Test 2:
  • Number of threads: 9 (Main thread + 8 calculation threads)
  • Processor affinity: None
  • Total time: 38.24 secs
image
Wow… this is my boy! 38 secs !!!
However, this are expected results. If you set more threads than physical cores, it is obvious that some thread scheduling should have to be done. Forcing threads to work on a certain CPU just brings down parallelization. As you can see we get almost no benefit when using 8 calculation threads instead of 4 (if affinity is enabled). So it´s clear that giving some freedom to Windows here, just to do its job, is by far the best option.
Winner of part 5 ………  Windows Scheduler !
 

Results

 graph


Test Vista Scheduler Processor Affinity
Part 1 149.45 secs 177.11 secs
Part 2 134.86 secs 138.14 secs
Part 3 76.59 secs 78.66 secs
Part 4 42.05 secs 41.76 secs
Part 5 38.24 secs 41.07 secs

So, what´s the optimal number of threads for my task?

Does this tendency (the more threads, the higher performance) continues forever? The answer is, obviously, no.
In an ideal, 100% intensive and constant task, the optimal number of threads would be the number of physical cores, but in real life, such an intensive task is very difficult to find. Almost every computation algorithm will have idle times, waiting for a memory paging operation or whatever. So, the number of threads that will give you top performance will depend on the intensiveness and constancy of your application.
I have measured some additional timings (for the OS scheduler version only):
        • 16 threads –> 37.89 secs.
        • 18 threads –> 37.44 secs.
        • 24 threads –> 38.03 secs.
So, for this task the tendency seems to break at 18 threads. You will have to make your own tests to find the optimal number of threads for your algorithm. However, we have proven that even in such an intensive task as this one, the optimal number of threads seems to be around 18 for a quad core machine, that means more than 4 times the number of physical cores!


Conclusions

1.- The Windows Scheduler does a GREAT job (specially in Vista). It beats a manual processor affinity setup almost in every cases, and in those where a manual setup wins the race, it´s by a very short distance.
2.- Even if the OS was a little bit worse in all cases would be advisable to use it, mostly because it´s automatic and you don´t have to worry about your thread´s location
3.- Processor affinity is one of the most important parallelism blockers, so use it if you really need it only, not because you are smarter than Vista. In other words: do not re-invent the wheel. Trust the OS wisdom.
 4.- Windows Vista Scheduler Rocks !


What´s all this information been used for?

Almost one million ray-mesh intersection tests, and what´s this stuff all about? Some people here in Spain says that if it´s white, and comes in a bottle, it´s probably milk… ;)
Massive Ray-Mesh intersection tests + Results stored as 2D table of data = Probably lighting calculations
This are the real results… hope you like it.
 
3darchitecture_chair_low


Take care!

Windows Vista Explorer. Upper Folder button missing

You have probably noticed one of the changes in Windows Vista Explorer: they removed the Upper Folder button.

Probably, Redmond guys thought it was enough with the newer folder navigation bar (like this one image), what is true most of the times, as it allows to one-click navigate not only to the upper folder, but also several levels up.

The CON comes when you navigate into a folder with a long name. In that case, the explorer won´t have room for any other folder than the current, showing something like this:

image

When that happens, you will have to click in the << symbol to pop the folders context menu up, and select the desired folder, what  means two infinitely long clicks (they should have keeped the parent folder in every case, with some ellipsis (…) if the name doesn´t fit…).

A very easy way to override this is to use the keyboard shortcut that takes you to the upper folder:      ALT + UP ARROW

And that´s it!

Cómo hacer el Hacha compatible con Windows Vista

Hoy he tenido que usar el Hacha, y no funcionaba en Vista, diciendo que le faltaba el archivo "msvbvm50.dll".

He visto a gente por inet ofreciendo packs con ese archivo, otros diciendo que había que poner el Hacha en "compatibilidad con XP". Bueno, pues ni lo primero ni lo segundo.

Basta con:

1.- Ir al directorio de Windows y buscar el fichero "msvbvm60.dll", la versión que viene en Vista. 2.- Copiar el fichero al directorio del hacha
3.- Renombrarlo, cambiando el 6 por el 5.

Al Hacha le da igual y funciona. Así que solucionado.

Salu2!

Disable automatic folder type discoverey in Vista Explorer

Vista is a great O.S. but, of course, has many things that could be better. Among all the things of Vista I don´t like, probably the most annoying one is the Automatic Folder Type Discovery feature.

This feature applies different templates to folders basing on their contents. For instance, if a folder contains mostly pictures, it will apply the "picture template" which uses a certain collection of columns for the files´properties: date the picture was taken, etc.


I don´t like this at all, basically for two reasons:

1.- It doesn´t work properly because it decides that a folder contains pictures when, in fact, has many other file types. And it´s absolutely annoying when you have a folder with 3d models, textures, sounds, etc, and you cannot see the "Modified Date" column or sort the files by "Type" because Vista decided that was a picture-only folder...

2.- This behavior might be appropiate for those home-users that normally use the computer for storing pictures and sending emails, but... what happens with developers and many other user profiles?

What I´m saying is: this feature would be good (if it worked better) for something like "Windows Vista Email-Sender-Only Edition", but I think that many people is asking for something like: "Windows Vista Developers Edition"... kindof "WindowsVista, without all the garbage".

Thankfully, this kind of stuff can be disabled. However, this time is a little bit trickier than just going to "that" menu and unchecking an option. Here it goes:


Note: This procedure implies editing the Windows Registry. Be sure to know what you are doing before proceeding and maybe, make a backup of the registry before changing it. If you don´t know what the registry is, or how to make a backup of it, maybe you shouldn´t go ahead...


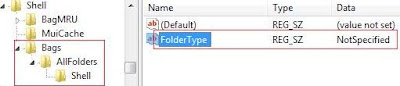
1.- Run regedit
2.- Go to:


HKEY_CURRENT_USER\Software\Classes\Local Settings\Software\Microsoft\Windows\Shell


3.- If not already present, create a new Key in ther named: "Bags"
4.- Inside that "Bags" key, add another one with the name: "AllFolders"
5.- Inside that "AllFolders" key, add another one with the name: "Shell"
6.- Inside the "Shell" key, add a new "String Value" or "Valor alfanumérico" (in spanish), with the name "FolderType".
7.- Modify the "FolderType" string setting the value: "NotSpecified". Your registry should look like this:


8.- Close regedit.


Et voilá!. The Automatic Folder Type Discovery feature is disabled.

Note: This procedure and picture was taken from here. Thanks to www.windows-now.com for the info.


Cheers!

Logitech Gaming Software 5.01 BUG: Corrupts Windows Vista Registry

Yesterday, I had to run the regedit (I realize, that for the first time in months) and it looked absolutely corrupt. The computer worked fine, but it´s aspect was scary, very scary...

I´m not such a Registry-Freak as many people there, you know, kind of: "hey, this process usually gets 0.5Mb of mem less, this should be a trojan", and then comes all the stuff with HighJackThis, Ant-Spy, Anti-Trojans and Anti-Spartans too... ;)

But I know enough about the registry to see that a hundred entries in the HKEY_CURRENT_USER with names like "{(", "Ó│" or "#a" are not good at all.

So, after one day and a half struggling with the issue, I´ve realized that the Logitech Gaming Software was to blame. See the following pics:

1.- Healthy Registry. (before installing Logitech Gaming Software 5.01):

2.- Registry after installing and reboot (strange entry marked in red):


3.- Registry after a second reboot (strange entry family growing):


The thing is, every time the system boots up, the LGS adds a crap entry to the registry, under HKEY_CURRENT_USER. So after a long while, your registry looks like "The Matrix" screensaver...

I´ve made a quick google about this stuff and found nothing, but maybe it´s a known issue. Anyway, I´ll send an email to the WingManTeam people to see if this is really a bug or it has a reasonable explanation (probably not ;).

My specs:

Dell XPS 420 (Quad Core, 3Gb RAM, GeForce 8800 GT). WindowsVista Ultimate 32 bits with Service Pack 1. Logitech G25 Racing Wheel.

Cheers!

Sistema de copia de archivos en Windows Vista

Los informáticos sabemos hacer la tira de cosas.

Por ejemplo, sabemos pintar una cadena de ADN enterita en 3D, sin dejarnos ni un solo cromosoma. Sabemos hasta guiar una sonda espacial a lo largo y ancho del cosmos, sin que se choque ni una sola vez con Bender ni la civilizción de Malacai (el que se arranca un brazo para bromear...).

Sin embargo, hay una tarea que se nos resiste. Realmente debe de ser algo que solo está al alcance de cuatro programadores rusos y algunos semi-dioses, porque desde los tiempos más remotos de Windows 3.11, seguimos sin ser capaces de calcular cuánto van a tardar en copiarse un puñado de ficheros.

Ciertamente, entiendo la problemática. Sé que es dificil, muy dificil... y probablemente yo no sabría hacerlo mejor de lo que lo hacía Windows XP. ¡Pero coño! cuando hoy me he encontrado con esta "Vista" los pelillos se me han puesto como picos de escarpias...


47.760 días y 2 horas. Tiene que ser la ostia llevar cuarentaysietemil días esperando y que todavía te queden dos horas eh?

En fin, que eso son aproximadamente 130 años, 292 días.... y 2 horas, por supuesto...

Más vale que al final la copia se hizo en 4 minutos... ¿Como carajo se puede programar un algoritmo que ante un retardito de caca llegue a la conclusión de que va a tardar 130 años? ¿Es que los chicos de Vista no conocen aquello de descartar datos basura?

Bueno, como soy un tío con fé, en breve espero poder decir ....

---- God bless the Service Pack 1 ----

porque nos haya resulelto cosillas como esta. A mi la verdad, me exasperan...

Saludos secuaces!