
What a long title, isn’t it?
That’s because, in some cases, there are a bunch of things related to make your .Net applications ready to work in both x86 and x64 environments. Specially if you need to use some unmanaged code or access the registry.
Let´s start!
In .Net, things are a bit different. As you probably know, your VB or C# code will not be compiled into binary, but into MSIL. It´s the JIT Compiler (Just-in-time) who translates this intermediate code into binary, at load time. During this process, it can decide to compile it into 32 bits code or into 64 bits code, to adapt it to the underlying O.S., basing on it’s bitness.
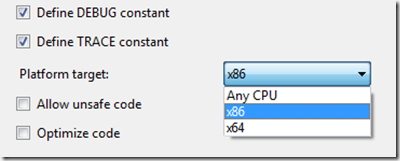
That´s the reason why, in .Net, you can choose not to specify the target platform of your assembly, by choosing the option “Any CPU”. The following picture is a snapshot of VisualStudio project’s properties page, where you select the target platform.
Then, why would I want to specify a target platform? Isn’t “Any CPU” the best option always?
Most of the times, yes, as developers usually build pure .Net applications, with no dependency on unmanaged code and no further optimizations, so “Any CPU” would be the best option, letting the JIT compiler decide.
But in there are some situations where you will want to specify the target platform. Some examples:
This blog post explains target platforms a bit further.
Have you played videogames on your PC with a machine emulator, like MAME or a Spectrum emulator? Well, this is something similar. WOW64 is a 32bit emulator that runs on 64bits machines, allowing 32bit applications to run in such environments.
Although we will talk about some issues regarding WOW64 later, you can find more details about WOW mode here.
If you know that it will always run in a (modern) x86 environment, you have no doubt about this. Your process is 32 bits.
But what´s its bitness if it can run in both x86 and x64 environments? Even further, if it´s in a x64 O.S., what bitness mode will the JIT compiler decide for it? Normally x64, but… better make sure. How to do this? Extremely easy:
System.IntPtr is designed to hold a memory address, right? And in .Net, it has a very convenient property that tells us its size. So, if this size is 8 bytes, then we have 64 bits addresses, if it´s 4 bytes, we are in a 32 bits environment. Easy as that.
Microsoft engineers decided not to mix up 32bits and 64bits applications inside your hard disk, so x64 applications are installed by default in the “Program Files” folder, as usual, and x86 applications are by default installed in a new “Program Files (x86)” folder.
Basically, this works in the following way: Windows intercepts registry calls made by assemblies and applications, and redirects them to the appropriate logical view of the registry, being this completely transparent to the application. More info about registry redirection here.
Although this naming convention is not 100% correct, we will call this two separate logical views as “the 32-bit registry” and “the 64-bit registry”.
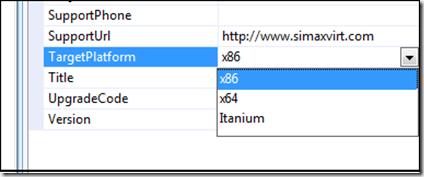
Unfortunately, we don´t have the “Any CPU” option here, so we will have to choose the platform manually. This platform selection affects the following aspects (among others):
Instead, you need to open the special version of RegEdit which shows you the “32-bit registry”, using:
Doing so in a Windows x64 machine will only access the “64-bit” version of the registry, even if your process is running in WOW64 mode. So, if our application was installed with a x86 Setup Project, the keys we are looking for won´t be there. We need to access the “32-bit registry” instead, provided by the WOW64.
This function has a parameter called samDesired, which can be a combination of flags specifying access options for the key. One of those possible options, is specifying we want to open the WOW64 view of the registry.
You just need to place your key name where “[Key]” is.
Stay tuned!
That’s because, in some cases, there are a bunch of things related to make your .Net applications ready to work in both x86 and x64 environments. Specially if you need to use some unmanaged code or access the registry.
Let´s start!
Compiling and running assemblies
Native code (C++, etc) is compiled into platform-specify binary. That´s why you need to specify the target platform to be x86 or x64…In .Net, things are a bit different. As you probably know, your VB or C# code will not be compiled into binary, but into MSIL. It´s the JIT Compiler (Just-in-time) who translates this intermediate code into binary, at load time. During this process, it can decide to compile it into 32 bits code or into 64 bits code, to adapt it to the underlying O.S., basing on it’s bitness.
That´s the reason why, in .Net, you can choose not to specify the target platform of your assembly, by choosing the option “Any CPU”. The following picture is a snapshot of VisualStudio project’s properties page, where you select the target platform.

Then, why would I want to specify a target platform? Isn’t “Any CPU” the best option always?
Most of the times, yes, as developers usually build pure .Net applications, with no dependency on unmanaged code and no further optimizations, so “Any CPU” would be the best option, letting the JIT compiler decide.
But in there are some situations where you will want to specify the target platform. Some examples:
- If you use any unmanaged code (which is platform-specific). You will have be careful with this, as your application could fail to load if the JIT compiler decides to put it into a mode not compatible with your unmanaged assemblies.
- If you want to optimize your assembly for an specific platform. For instance, if you need an application to access huge amounts of RAM memory, you will probably want to make it 64 bits only.
This blog post explains target platforms a bit further.
Platforms compatibility
- If my assembly is compiled as Any CPU:
- Will it run in a x86 environment –> Yes (JIT compiles it into x86 binary)
- Will it run in a x64 environment –> Yes (JIT compiles it into x64 binary)
- If my assembly is compiled as x64 only:
- Will it run in a x86 environment –> No
- Will it run in a x64 environment –> Yes
- If my assembly is compiled as x86 only:
- Will it run in a x86 environment –> Yes
- Will it run in a x64 environment –> Yes (In WOW64 Mode)
WOW64 Mode
As backwards compatibility is good for selling licenses, Windows 64 bits offer a compatibility mode for 32bit applications. It´s the so called WOW Mode (Windows on Windows).Have you played videogames on your PC with a machine emulator, like MAME or a Spectrum emulator? Well, this is something similar. WOW64 is a 32bit emulator that runs on 64bits machines, allowing 32bit applications to run in such environments.
Although we will talk about some issues regarding WOW64 later, you can find more details about WOW mode here.
Detecting the bitness of a “Any CPU” process
What happens if you compiled your assembly to “Any CPU”?If you know that it will always run in a (modern) x86 environment, you have no doubt about this. Your process is 32 bits.
But what´s its bitness if it can run in both x86 and x64 environments? Even further, if it´s in a x64 O.S., what bitness mode will the JIT compiler decide for it? Normally x64, but… better make sure. How to do this? Extremely easy:
if (IntPtr.Size == 4)
return eArchitecture.x86;
else if (IntPtr.Size == 8)
return eArchitecture.x64;
Please note: If your assembly was compiled as x86, its bitness will always be 32 bits, as even when running in 64-bit environments, it will do in WOW64 mode (emulated 32 bits), and its bitness will remain 32.
Windows 64-bit infrastructure
As mentioned above, Windows 64 bits offers the WOW64 mode, to allow running x86 applications.Microsoft engineers decided not to mix up 32bits and 64bits applications inside your hard disk, so x64 applications are installed by default in the “Program Files” folder, as usual, and x86 applications are by default installed in a new “Program Files (x86)” folder.
The Windows x64 registry
In Windows x64, WOW64 mode offers separate logical view of the registry for 32-bit and 64-bit applications. It´s like if they were accessing to two separate registries. This is something important to take into account when developing for x64 and when deploying applications, as x86-targeted Setup Projects will also access differently to the registry.Basically, this works in the following way: Windows intercepts registry calls made by assemblies and applications, and redirects them to the appropriate logical view of the registry, being this completely transparent to the application. More info about registry redirection here.
Although this naming convention is not 100% correct, we will call this two separate logical views as “the 32-bit registry” and “the 64-bit registry”.
Application deployment with Visual Studio setup projects
If you, like many other people, use Visual Studio setup projects and Windows Installer to deploy your applications, there are several things that you need to take care of, if your software needs to be both x86 and x64 compatible.Target platform in VisualStudio Setup Projects
Just like normal assemblies, setup projects also have a target platform property. You can see it in the properties tab, when you select your project in the solution explorer.
Unfortunately, we don´t have the “Any CPU” option here, so we will have to choose the platform manually. This platform selection affects the following aspects (among others):
- The default installation folder for your application: “Program Files”, or “Program Files (x86)”
- If the setup project modifies the registry, it will affect the so-called-by-us “64-bit registry”, or the redirected “32-bits registry” for WOW64 processes. This is something important to keep in mind if you are using registry keys in your setup project.
So, which platform should I choose for the Setup Project?
It depends on how well your application is prepared for x64, and on how it is compiled:- If your application is compiled as x86: choose x86
- If your application is compiled as x64: choose x64
- If your application is compiled as “Any CPU”:
- If you know it is prepared to be run as x64 (i.e. registry accessing code is aware of WOW64 mode): choose x64
- If you cannot assure that your application will deal fine with x64 infrastructure: choose x86
Dude, where are my registry keys?
As mentioned above, if your Setup Project is compiled as x86, it won´t modify the “64-bit registry”, but the 32-bit, redirected version, provided by the WOW64 mode. So, if you open regedit.exe normally (which shows you the “64-bit” version of the registry), you won´t find anything.Instead, you need to open the special version of RegEdit which shows you the “32-bit registry”, using:
[Windows Installation path]\SysWOW64\regedit.exe
Please note: Windows Installation Path is normally “C:\Windows”.
Accessing the registry from C#
Now that you understand how Windows x64 infrastructure is designed, and how your applications will be installed by Setup Projects, you will probably need to learn how to deal with both versions of the Windows x64 Registry. Specially if your application will be compiled as x86, and therefore run in WOW64 mode.The usual, .Net way to access the registry
Imagine you want to read a certain key inside the “LOCAL_MACHINE\Software” node of the registry. In .Net, you normally do that by using a code similar to the following (using namespace: Microsoft.Win32):
RegistryKey key = Registry.LocalMachine.OpenSubKey("Software\\[Your Key Here]");
Accessing the 32-bit, WOW64 registry from C#
Unfortunately (and by now) there is no way in .Net to specify that we wont to access the “32-bit”, WOW64, version of the registry. To do so, we will have to deal with native API calls, dll-importing “advapi32.dll” and using the RegOpenKeyEx.This function has a parameter called samDesired, which can be a combination of flags specifying access options for the key. One of those possible options, is specifying we want to open the WOW64 view of the registry.
Table of flags for samDesired
| Value | Meaning |
|---|---|
| KEY_ALL_ACCESS (0xF003F) | Combines the STANDARD_RIGHTS_REQUIRED, KEY_QUERY_VALUE, KEY_SET_VALUE, KEY_CREATE_SUB_KEY, KEY_ENUMERATE_SUB_KEYS, KEY_NOTIFY, and KEY_CREATE_LINK access rights. |
| KEY_CREATE_LINK (0x0020) | Reserved for system use. |
| KEY_CREATE_SUB_KEY (0x0004) | Required to create a subkey of a registry key. |
| KEY_ENUMERATE_SUB_KEYS (0x0008) | Required to enumerate the subkeys of a registry key. |
| KEY_EXECUTE (0x20019) | Equivalent to KEY_READ. |
| KEY_NOTIFY (0x0010) | Required to request change notifications for a registry key or for subkeys of a registry key. |
| KEY_QUERY_VALUE (0x0001) | Required to query the values of a registry key. |
| KEY_READ (0x20019) | Combines the STANDARD_RIGHTS_READ, KEY_QUERY_VALUE, KEY_ENUMERATE_SUB_KEYS, and KEY_NOTIFY values. |
| KEY_SET_VALUE (0x0002) | Required to create, delete, or set a registry value. |
| KEY_WOW64_32KEY (0x0200) | Indicates that an application on 64-bit Windows should operate on the 32-bit registry view. For more information, see Accessing an Alternate Registry View. This flag must be combined using the OR operator with the other flags in this table that either query or access registry values.
|
| KEY_WOW64_64KEY (0x0100) | Indicates that an application on 64-bit Windows should operate on the 64-bit registry view. For more information, see Accessing an Alternate Registry View. This flag must be combined using the OR operator with the other flags in this table that either query or access registry values.
|
| KEY_WRITE (0x20006) | Combines the STANDARD_RIGHTS_WRITE, KEY_SET_VALUE, and KEY_CREATE_SUB_KEY access rights. |
The code
The next code is a personal translation to C# of several pieces of code I found, mostly from here:
[DllImport("advapi32.dll", CharSet = CharSet.Unicode, EntryPoint = "RegOpenKeyEx")]
static extern int RegOpenKeyEx(IntPtr hKey, string subKey, uint options, int sam, out IntPtr phkResult);
[Flags]
public enum eRegWow64Options : int
{
None = 0x0000,
KEY_WOW64_64KEY = 0x0100,
KEY_WOW64_32KEY = 0x0200,
// Add here any others needed, from the table of the previous chapter
}
[Flags]
public enum eRegistryRights : int
{
ReadKey = 131097,
WriteKey = 131078,
}
public static RegistryKey OpenSubKey(RegistryKey pParentKey, string pSubKeyName, bool pWriteable,
eRegWow64Options pOptions)
{
if (pParentKey == null || GetRegistryKeyHandle(pParentKey).Equals(System.IntPtr.Zero))
throw new System.Exception("OpenSubKey: Parent key is not open");
eRegistryRights Rights = eRegistryRights.ReadKey;
if (pWriteable)
Rights = eRegistryRights.WriteKey;
System.IntPtr SubKeyHandle;
System.Int32 Result = RegOpenKeyEx(GetRegistryKeyHandle(pParentKey), pSubKeyName, 0,
(int)Rights | (int)pOptions, out SubKeyHandle);
if (Result != 0)
{
System.ComponentModel.Win32Exception W32ex = new System.ComponentModel.Win32Exception();
throw new System.Exception("OpenSubKey: Exception encountered opening key", W32ex);
}
return PointerToRegistryKey(SubKeyHandle, pWriteable, false);
}
private static System.IntPtr GetRegistryKeyHandle(RegistryKey pRegisteryKey)
{
Type Type = Type.GetType("Microsoft.Win32.RegistryKey");
FieldInfo Info = Type.GetField("hkey", BindingFlags.NonPublic | BindingFlags.Instance);
SafeHandle Handle = (SafeHandle)Info.GetValue(pRegisteryKey);
IntPtr RealHandle = Handle.DangerousGetHandle();
return Handle.DangerousGetHandle();
}
private static RegistryKey PointerToRegistryKey(IntPtr hKey, bool pWritable, bool pOwnsHandle)
{
// Create a SafeHandles.SafeRegistryHandle from this pointer - this is a private class
BindingFlags privateConstructors = BindingFlags.Instance | BindingFlags.NonPublic;
Type safeRegistryHandleType = typeof(SafeHandleZeroOrMinusOneIsInvalid).Assembly.GetType(
"Microsoft.Win32.SafeHandles.SafeRegistryHandle");
Type[] safeRegistryHandleConstructorTypes = new Type[] { typeof(System.IntPtr), typeof(System.Boolean) };
ConstructorInfo safeRegistryHandleConstructor = safeRegistryHandleType.GetConstructor(privateConstructors,
null, safeRegistryHandleConstructorTypes, null);
Object safeHandle = safeRegistryHandleConstructor.Invoke(new Object[] { hKey, pOwnsHandle });
// Create a new Registry key using the private constructor using the safeHandle - this should then behave like
// a .NET natively opened handle and disposed of correctly
Type registryKeyType = typeof(Microsoft.Win32.RegistryKey);
Type[] registryKeyConstructorTypes = new Type[] { safeRegistryHandleType, typeof(Boolean) };
ConstructorInfo registryKeyConstructor = registryKeyType.GetConstructor(privateConstructors, null,
registryKeyConstructorTypes, null);
RegistryKey result = (RegistryKey)registryKeyConstructor.Invoke(new Object[] { safeHandle, pWritable });
return result;
}
How to use the code
The OpenSubKey will return the searched key, allowing you to specify reading from the normal registry, or from the alternative 32-bit, WOW64 registry. The following example reads from the 32-bit WOW64 registry:
try
{
RegistryKey key = OpenSubKey(Registry.LocalMachine,"Software\\[Key]",false,eRegWow64Options.KEY_WOW64_32KEY);
}
catch
{
// Parent key not open, exception found at opening (probably related to security permissions requested)
}
How to make your application a bulletproof registry reader
Now that your have a way to read both versions of the registry in x64 environments, I´d suggest you to proceed the following way:- Try to find your key in the usual, standard, .Net way, using the build-in “Registry.LocalMachine.OpenSubKey”. This case will cover your application running in a 32-bit Windows, or running in a 64-bit Windows, but not in WOW64 mode.
- If key not found, proceeding in one of the following paths:
- Check Windows version
- 32 bits: Exception, key not found
- 64 bits: Try to find the key in the WOW64 registry with the above code, and launch exception if not found.
- Try to read the WOW64 registry directly, enclosing your code in try-catch statement, if any exception is caught, or if key not found, launch exception
Stay tuned!


