2D Circle Packing algorithm ported to C#

Yesterday, a friend asked me if I knew of any C# implementation of a Circle Packing algorithm. In fact, I didn’t, but searching a bit I found this algorithm, and this Java Applet implementation. 
Packing of different circles into a 2D space, trying to minimize the unused space, is a typical geometrical problem. Humans can solve it quite quickly, but it is very hard to find a solution mathematically. The most frequent implementations use numeric algorithms that get closer to the solution in each iteration.
It is the case of the above algorithm. It doesn’t implement the limits of the available space, but reorders the circles around a center point quite well. The “flowing” nature of numerical algorithms like these fit specially well if you want to use them for some kind of graphical interface, as you can change the adaptation (or reordering) speed, giving a very nice animated result, or you can even interact with your circles, as moving some of them will make the algorithm to react adapting others (you can try the above applet).
So, with all that material, it was easy to port it to C#. The result is the following:
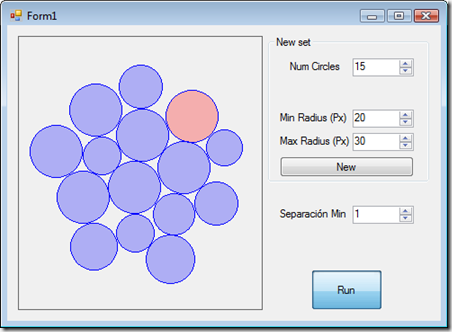
image
The code for a very easy Circle class (please note that I´m using the XNA framework for the maths –Vector2, etc-):
public class Circle
    {
        public Vector2 mCenter;
        public float mRadius;
 
        /// <summary>
        ///
        /// </summary>
        /// <param name="iCenter"></param>
        /// <param name="Radius"></param>
        public Circle(Vector2 iCenter, float Radius)
        {
            mCenter = iCenter;
            mRadius = Radius;
        }
        /// <summary>
        ///
        /// </summary>
        /// <returns></returns>
        public override string ToString()
        {
            return "Rad: " + mRadius + " _ Center: " + mCenter.ToString();
        }     
    }
And the important class. CirclePacker:
This class holds a list of circles that will be re-arranged around a “PackingCenter” point, with a “MinSeparation” between them. You only need to iteratively call the OnFrameMove method, passing an “iterationCounter” parameter, that will hold the damping on the adaptation speed (the bigger value, the slower adaptation). Reset this parameter to 1 always you want to reset speed (never set this parameter to 0).
  public class CirclePacker
    {
        public List<Circle> mCircles = new List<Circle>();
        public Circle mDraggingCircle = null;
        protected Vector2 mPackingCenter;
        public float mMinSeparation = 1f;
 
        /// <summary>
        /// Generates a number of Packing circles in the constructor.
        /// Random distribution is linear
        /// </summary>
        public CirclePacker(Vector2 pPackingCenter, int pNumCircles,
                            double pMinRadius, double pMaxRadius)
        {
            this.mPackingCenter = pPackingCenter;
 
            // Create random circles
            this.mCircles.Clear();
            Random Rnd = new Random(System.DateTime.Now.Millisecond);
            for (int i = 0; i < pNumCircles; i++)
            {
                Vector2 nCenter = new Vector2((float)(this.mPackingCenter.X +
                                                      Rnd.NextDouble() * pMinRadius),
                                              (float)(this.mPackingCenter.Y +
                                                      Rnd.NextDouble() * pMinRadius));
                float nRadius = (float)(pMinRadius + Rnd.NextDouble() *
                                       (pMaxRadius - pMinRadius));
                this.mCircles.Add(new Circle(nCenter, nRadius));
            }
        }
        /// <summary>
        ///
        /// </summary>
        /// <param name="?"></param>
        /// <returns></returns>
        private float DistanceToCenterSq(Circle pCircle)
        {
            return (pCircle.mCenter - mPackingCenter).LengthSquared();
        }
        /// <summary>
        ///
        /// </summary>
        private int Comparer(Circle p1, Circle P2)
        {
            float d1 = DistanceToCenterSq(p1);
            float d2 = DistanceToCenterSq(P2);
            if (d1 < d2)
                return 1;
            else if (d1 > d2)
                return -1;
            else return 0;
        }
        /// <summary>
        ///
        /// </summary>
        public void OnFrameMove(long iterationCounter)
        {
            // Sort circles based on the distance to center
            mCircles.Sort(Comparer);
 
            float minSeparationSq = mMinSeparation * mMinSeparation;
            for (int i = 0; i < mCircles.Count - 1; i++)
            {
                for (int j = i + 1; j < mCircles.Count; j++)
                {
                    if (i == j)
                        continue;
 
                    Vector2 AB = mCircles[j].mCenter - mCircles[i].mCenter;
                    float r = mCircles[i].mRadius + mCircles[j].mRadius;
 
                    // Length squared = (dx * dx) + (dy * dy);
                    float d = AB.LengthSquared() - minSeparationSq;
                    float minSepSq = Math.Min(d, minSeparationSq);
                    d -= minSepSq;
 
                    if (d < (r * r) - 0.01 )
                    {
                        AB.Normalize();
 
                        AB *= (float)((r - Math.Sqrt(d)) * 0.5f);
 
                        if (mCircles[j] != mDraggingCircle)
                            mCircles[j].mCenter += AB;
                        if (mCircles[i] != mDraggingCircle)
                            mCircles[i].mCenter -= AB;
                    }
 
                }
            }
 
 
            float damping = 0.1f / (float)(iterationCounter);
            for (int i = 0; i < mCircles.Count; i++)
            {
                if (mCircles[i] != mDraggingCircle)
                {
                    Vector2 v = mCircles[i].mCenter - this.mPackingCenter;
                    v *= damping;
                    mCircles[i].mCenter -= v;
                }
            }
        }       
        /// <summary>
        ///
        /// </summary>
        public void OnMouseDown(MouseEventArgs e)
        {
            Vector2 center = new Vector2(e.X, e.Y);
            mDraggingCircle = null;
            foreach (Circle circle in mCircles)
            {
                float dist = (circle.mCenter - center).LengthSquared();
                if (dist < (circle.mRadius * circle.mRadius))
                {
                    mDraggingCircle = circle;
                    break;
                }
            }           
        }
        /// <summary>
        ///
        /// </summary>
        public void OnMouseMove(MouseEventArgs e)
        {
            if (mDraggingCircle == null)
                return;
 
            mDraggingCircle.mCenter = new Vector2(e.X, e.Y);
        }
    }


To do

A variable speed system could be done, and a way to interactively change the PackingCenter point would be nice too. It would also be necessary to implement the limits of the available space, changing the radius of the circles proportionally if they don´t fit.
Cheers!

Fast interoperability of 2D shapes between 3D applications and your software

Preface

Wikipedia says that interoperability is “a property referring to the ability of diverse systems and organizations to work together (inter-operate)”. Regarding software, it says that interoperability is “the capability of different programs to exchange data via a common set of exchange formats”. This has always been a problem, specially when talking about software that manages 3D or 2D information, due to the volume and diversity of the information to be exchanged.

Why is that a problem?

In 2D images, for instance, it has always been more or less clear what kind of information applications should share: 2D tables of colors, expressed in one format or another, but color or amount of light, after all. There are some ‘de-facto’ standards like TGA (coming from IBM) and others developed by institutions or committees, like JPEG (name coming from Joint Photographic Experts Group). Some formats try to include other information, like opacity (alpha channels), or to express the same information in other forms, like the so-called HDR (High Dynamic Range) images, which need to store lighting information in floating point.
3D is a completely different story. Mostly because while 2D imaging is a mature field (and a relatively simple one too), 3D visualization is still changing a lot form month to month, with new techniques and algorithms, that need new and complex information stored in files. In addition to that, there are several kind of 3D applications, with different needs too: 3D modeling packages, real-time applications, videogames, etc. All this stuff makes interoperability a hard issue, and sharing a scene from two different applications can be a nightmare, with un-recognized parameters, missing information, etc.
However, and despite the written above, there have been many tries to become certain file formats a standard. It is the case of the old 3DS (from AutoDesk), the X File Format (from Microsoft –DirectX-), or the newer FBX, which is the latest try from AutoDesk to build a standard 3D file format, and is also supported by XNA.

The 2D shapes case

It may seem something obvious, but 3D formats are very focused in 3D, and 2D shapes are frequently left apart. For instance, neither 3DS or the default FBX file formats support 2D shapes. And that’s a problem, as 2D shapes like splines are very useful for many things in our software: paths or trajectories for animation, A.I., etc.

What’s the solution?

In fact, there are many solutions:
  1. Use a different file format that supports 2D shapes
  2. Use the FBX SDK to make your own exporters/importers
  3. Export 2D shapes as 3D objects (this is what 3DSMax does when using the 3DS file format, for instance).
  4. etc.
I guess the best option would be the second one: use the FBX format, which seems to be the next standard, and until support for 2D shapes is included on it, make your own exporters/importers. However, that would take quite a bunch of ours, learning to use the SDK, and making exporters and importers for the different 3D modeling packages round there. You should go this way, but if you do not have time enough, I´ll show you here an easier solution, using an existing file format.

Choosing the proper file format

There are several file formats which support 2D shapes, but not all of them are Open Formats. Among the usually supported by 3D modeling applications, we find two “mostly open” formats: the ASE file format (ASCII) and the OBJ file format, developed by WaveFront. Both of them would make it, but we will choose the second (OBJ) because the first one is a bit more complex, and because 3DSMax does not include an ASE importer by default (it comes with an exporter only).

The OBJ parser (2D shapes only)

Please note: I won’t write here a full parser of the OBJ format. We will just include a few lines of code to read OBJ files which hold information of 2D splines.
The following class will read each 2D shape present in the OBJ file, and store the list of vertices in a Dictionary (keyed by the name of the shape). Please note that I have just tested this code with OBJ files exported from 3DS Max, storing 2D splines only. You can make your own tests and change the code as necessary. A call to “LoadFile” will fill the “mFoundSplines” collection with the information of the shapes found in the file.
Note: Some 3D applications, like 3DSMax, use axis coordinates with the “Z” pointing “up”, while others prefer coordinates with the “Y” pointing up. In my case, this second option is the default, so if you want Z to point up (to read or save files from/to 3DSMax), you should set the parameter “pSwapYZ” to true in the call to LoadFile.
  public class OBJFileParser
  {
        public static Dictionary<string, DX.Vector3[]> mFoundSplines;
        private static System.IO.StreamReader mStrmReader;
 
        /// <summary>
        ///
        /// </summary>
        public static void LoadFile(string pFullFileName, bool pSwapYZ)
        {
            try
            {
                mFoundSplines = new Dictionary<string, Microsoft.DirectX.Vector3[]>();
                mStrmReader = new System.IO.StreamReader(pFullFileName);
                while (!mStrmReader.EndOfStream)
                {
                    string line = mStrmReader.ReadLine();
                    if (line.StartsWith("# shape"))
                    {
                        string[] parts = line.Split(' ');
                        if (parts.Length != 3)
                            continue;
                        ReadShape(parts[2], pSwapYZ);
                    }
                }
            }
            finally { mStrmReader.Close(); }
        }
        /// <summary>
        ///
        /// </summary>
        private static void ReadShape(string pShapeName, bool pSwapYZ)
        {
            List<DX.Vector3> vertices = new List<Microsoft.DirectX.Vector3>();
 
            while (!mStrmReader.EndOfStream)
            {
                string line = mStrmReader.ReadLine();
 
                // Skip lines starting with #
                if (line.StartsWith("#"))
                    continue;
 
                // Read Vertex
                if (line.StartsWith("v"))
                {
                    // Important !: There are two spaces (‘ ‘) between the “v” and the
                    // first component of the vector. Split will return 5 strings
                    string[] parts = line.Split(' ');
                    if (parts.Length != 5)
                        continue;
 
                    if(pSwapYZ)
                        vertices.Add(new Microsoft.DirectX.Vector3(float.Parse(parts[2]), float.Parse(parts[4]), float.Parse(parts[3])));
                    else vertices.Add(new Microsoft.DirectX.Vector3(float.Parse(parts[2]), float.Parse(parts[3]), float.Parse(parts[4])));
                }
 
                // Shapes have a line starting with "g" (plus the name of the shape), and 
                // another one with what seems to be indices to vertices. In this case,
                // we won´t read that info, so we will use the "g"-starting line to detect
                // the end of a shape
                if (line.StartsWith("g"))
                    break;
            }
 
            // Add Spline
            if (vertices.Count > 0)
                    mFoundSplines.Add(pShapeName, vertices.ToArray());           
        }
    }

The OBJ saver (2D shapes only)

We will save now our Splines following the OBJ format, and making sure that 3DS Max is able to read it. To use it you need to call each method like:
  • OBJFileSaver.StartNewFile(): To reset internal collections
  • OBJFileSaver.AddShape(): To add each shape you want to save
  • OBJFileSaver.SaveFile(): To finally save everything to disk.
Note: Some 3D applications, like 3DSMax, use axis coordinates with the “Z” pointing “up”, while others prefer coordinates with the “Y” pointing up. In my case, this second option is the default, so if you want Z to point up (to read or save files from/to 3DSMax), you should set the parameter “pSwapYZ” to true in the call to SaveFile.
    public class OBJFileSaver
    {
        private static System.IO.StreamWriter mStrmWriter = null;
        private static Dictionary<string, DX.Vector3[]> mShapes;
 
        /// <summary>
        ///
        /// </summary>
        /// <param name="pFullFileName"></param>
        public static void StartNewFile()
        {
            mShapes = new Dictionary<string, Microsoft.DirectX.Vector3[]>();
        }
        /// <summary>
        ///
        /// </summary>
        /// <param name="?"></param>
        /// <param name="pShape"></param>
        public static void AddShape(string pShapeName, DX.Vector3[] pShape)
        {
            mShapes.Add(pShapeName, pShape);
        }
        /// <summary>
        ///
        /// </summary>
        public static void SaveFile(string pFullFileName, bool pSwapYZ)
        {
            try
            {
                mStrmWriter = new System.IO.StreamWriter(pFullFileName);
                int vertexIdx = 1;
                foreach (string name in mShapes.Keys)
                {
                    WriteShape(name, vertexIdx, pSwapYZ);
                    vertexIdx += mShapes[name].Length;
                }
            }
            finally
            {
                mStrmWriter.Close();
            }
        }
        /// <summary>
        ///
        /// </summary>
        /// <param name="pName"></param>
        private static void WriteShape(string pShapeName, int pVertexStartIdx, bool pSwapYZ)
        {
            // Write header
            mStrmWriter.WriteLine("");
            mStrmWriter.WriteLine("#");
            mStrmWriter.WriteLine("# shape " + pShapeName);
            mStrmWriter.WriteLine("#");
            mStrmWriter.WriteLine("");
 
            // Write vertices. Important !!: Set two (2) spaces between "v" and X component of vertex.
            foreach (DX.Vector3 vec in mShapes[pShapeName])
            {
                if(pSwapYZ)
                    mStrmWriter.WriteLine(string.Format("v  {0} {1} {2}", vec.X, vec.Z, vec.Y));
                else mStrmWriter.WriteLine(string.Format("v  {0} {1} {2}", vec.X, vec.Y, vec.Z));
            }
 
            // Write number of vertices
            mStrmWriter.WriteLine("# " + mShapes[pShapeName].Length + " vertices");
            mStrmWriter.WriteLine("");
 
            // Write the "g" line, with the name of the shape again
            mStrmWriter.WriteLine("g " + pShapeName);
 
            // Write what seems to be a trivial list of indices to vertices.
            // It doesn´t re-start for each shape
            string indices = "l ";
            int vertexIdx = pVertexStartIdx;
            for (int i = 0; i < mShapes[pShapeName].Length; i++)
            {
                indices += vertexIdx + " ";
                vertexIdx++;
            }
            mStrmWriter.WriteLine(indices);
 
            mStrmWriter.WriteLine("");
            mStrmWriter.Flush();
        }
 
    }


Limitations of this class

Keep in mind that this class will only export the output geometry of your Splines (only vertex positions) and the name of the shape. Other parameters like Spline tension, continuity, tangents, etc is not included. Any other information regarding 3DSMax or any other modeling application (like interpolation properties) will not be saved neither.

Conclusion

Until more standard formats like FBX support 2D shapes (something that should happen soon), this is a very easy way to add support for 2D shapes to your applications.
Hope you find it useful !

View TGA files thumbnails in Windows Explorer

For those of you who usually work with TGA files, this app is a must. THUMB PLUG TGA

Basically, it will allow you to view picture´s thumbnails in the Windows Explorer.

More info about the TGA plugin (and also about PIC and IFF plugins) for explorer, as well as the source code here: http://greggman.com/pages/thumbplug_tga.htm

Un dĆ­a muy feliz

Volvƭ de viaje ayer a las seis de la tarde. Hacƭa tanto calor que me metƭ en casa con las persianas bajadas y encendƭ el portƔtil tratando de no darle mucha tralla, para que no activara los ventiladores y echara todavƭa mƔs calor hacia afuera.

mvplogoNada mĆ”s abrir el outlook, me encontrĆ© con una de las mejores noticias que he tenido nunca en mi vida profesional. HabĆ­a sido elegido como MVP de Microsoft en la categorĆ­a de DirectX/XNA. Es un enorme honor, teniendo en cuenta lo exclusivo del programa y la talla de la gente que pertenece a el. Gente que siempre he admirado estĆ” ahĆ­, gente como Andy “The ZMan” Dunn, uno de los artĆ­fices de MDX y autor del blog ZBuffer, Jim Perry, Vicente Cartas, Phil Bourke, Promit Roy, responsable del gran SlimDX, Chema Alonso (maligno), Marino Posadas, Octavio Hernandez, Carlos Segura, Unai Zorrilla, Rodrigo Corral, Ivan Gonzalez, Juan Carlos Gonzalez, Guillermo Som “El Guille”, y otros muchos muchos…

En fin, lo dicho. ¡Un GRAN honor!

Muchas gracias a todos.

Autodesk 3DSMax 2009. Bug in 3DS Exporter

In the past weeks, we have been working with some 3D models done by another company with 3DSMax 2009, and exported to the 3DS file format, so we can read it. We realized that each model which included Bump Maps, had a wrong map percentage amount in the file.

A note: In the case of Bump Maps, the real map percentage is not stored in the usual Map Percentage (as INT_PERCENTAGE OR FLOAT_PERCENTAGE, chunks 0x0030 or 0x0031), but in the MAT_BUMP_PERCENT (chunk 0xA252) that comes with the material (if you read chunks sequentially instead of by hierarchy, you will normally find it after the MAP_BUMP chunk).

A material with a bump percentage of 999 in 3dsMax will report a percentage of 9 in the file. Of course, materials with more usual bump percentages (below 100), will report no bump at all (zero) in the file. In fact, if you export a model with a 90% of bump, and import back to 3DSMax, you will see that the bump texture is assigned correctly, but the bump percentage is 0.

I installed today the trial version of 3DSMax 2010, with it´s hotfix, just to see if they fixed it. And no, the bug is still there. Will try to report to Autodesk.

For those who still don´t know what is 3DSMax and what you can do with such a powerful program, some mind-blowing pics I´ve found at CGArena. They show the process of creating a human-like 3D model, a replica of the Korean actress 'Song Hye Kyo'.

songtexture1 songhair2

scene1scene2

final

AMAZING!!!!

Direct Input Custom Action Mapping (refresh)

ManagedDirectx is quite a bit outdated, and no longer supported by Microsoft, but it will make it for this example on custom action mapping. I´d suggest you to go XNA or SlimDX if you want to do some serious .Net graphics or game development.
What´s this post about? It´s about having a decent controller configuration system. The first choice, of course, is to start looking at DirectInput´s Action Mapping. If you prefer to do that on your own (to get rid of the standard and no too customizable DX config dialog, for example), keep reading.
The main task we want to make in our ActionMapping is to be able to save to disk and recover a controller configuration, which assign an InputDevice and an Object of that device to a GameAction defined by us.

PART 1: Define game actions

We will put all of our actions in an enumeration.
        enum eGameActions
        {
            MoveForward,
            MoveBackward,
            TurnLeft,
            TurnRight,
            Shoot,
            . . .
            NumberOfActions    // Not an action, just to know the total count of actions
        }

A quick note for beginners: There´s a very useful class in the .Net Framework called System.Enum. This class has static methods to loop through members of an enumeration and more. Things like:
  • Enum.GetNames ( typeof (eGameActions) ) : Will return a string[] with: "MoveForward", "MoveBackward" and so on.
  • Enum.IsDefined( typeof(eGameActions), 6 ): Will return false because eGameActions doesn't have that member.
  • Enum.Parse(typeof(eGameActions), string): Will try to convert any string representation of an enumeration, to the enumeration itself.

PART 2: Inmediate or Buffered mode?

The next step is to make an important choice: Inmediate or Buffered mode? Pasting here the DX SDK description of both modes:
“DirectInput supplies two types of data: buffered and immediate. Buffered data is a record of events that are stored until an application retrieves them. Immediate data is a snapshot of the current state of a device. You might use immediate data in an application that is concerned only with the current state of a device - for example, a flight combat simulation that responds to the current position of the joystick and the state of one or more buttons. Buffered data might be the better choice where events are more important than states - for example, in an application that responds to movement of the mouse and button clicks. You can also use both types of data, as you might, for example, if you wanted to get immediate data for joystick axes but buffered data for the buttons.”
DX standard Action Mapping works in Buffered Mode only, but we will want to provide a way of using both. Why? Because we want an Input library for all of our projects, regardless they fit best with a buffered or immediate mode.
Immediate Mode
Take a look at how data is reported under the Inmediate Mode: all you get is a struct of the type JoystickState, MouseState or KeyboardState, which has all the data you need under some default fields, defined by DirectX (like AxisX, AxixY, etc). This fields are always the same, no matter which device you are accessing to. It´s the device´s builder (i.e. Logitech) who decides what physical objects are mapped to what DX default fields. An example:
  • For a joystick, it´s quite trivial to map it´s objects to fields, because JoystickState was originally designed for that: joysticks (as it´s name states). So, the AxisX field will almost always be mapped to the X-Axis of the joystick.
  • What happens for a driving wheel? That´s something DirectInput was not originally designed for, and when this kind of devices came out, instead of adapting DInput for them, DX guys decided to use existing structs to handle new devices. So, there´s no default field in the JoystickState structure for the WheelAxis object. In this way, some device builders will map wheel axis to AxisX, while others will do to the Rx Axis, and so on...
Buffered Mode
In buffered mode, you don´t get access to the whole structure of data. Instead of that, you call the GetBufferedData() method, which retrieves a collection of BufferedData objects, one for each changing object in the device. That means, if the device is absolutely stall, no data will be returned.
One tip: To set the buffered mode, you have to manually change the property:  Device.Properties.BufferSize = 16

PART 3: Making the relationship

We need a way to save and recover from a file something like this: Action="Steering Action" PhysicalDevice="Logitech G25" PhysicalObject="Wheel Axis". We will use XML based files to store the info. How?
  1. The first attribute is easy, just gameAction.ToString() to save, and Enum.Parse(typeof(eGameActions), attributeInnerText); to recover from the file.
  2. The second attribute is not hard either. Instead of saving device´s name, we will save device´s Guid: Write the guid as DeviceGuid.ToString() and recover it as: DeviceGuid = new Guid(attributeGuid.InnerText );
  3. The third attribute.... aaaahhh. This is a little bit more tricky.
We need a way to identify the device´s object we want to map the action to.
Bind up the physical object
What do we put in the XML file to identify the device´s physical object? It´s name? It´s ID? It´s offset? Any of them would work if we´d only need to recover info about a physical device, as it´s name, properties, etc. You can do that, looping through the collection Device.Objects, and searching by any of that terms. The problem is that we don´t only need that, we need to retrieve data from that object.
In Buffered Mode, physical objects are identified through an Offset provided by the GetBufferedData method (inside the BufferedData class). If you look into it, you will realize that this offset is, in fact, the offset inside the JoystickState structure provided by the Immediate Mode. So, it seems we have found a unique identifier for our physical objects, that works in both immediate and buffered mode: THE OBJECT´S OFFSET.
So, our XML configuration file will handle information like the following:
Map Action="Steering Action" PhysicalDeviceGuid="1820-12820-2147-94579-3426-4575" PhysicalObjectOffset="138452"

PART 4: Designing the ActionMap class

It´s a good Idea to define a ActionMap class, to handle the mapping between a GameAction and a Physical Object, and store information about the read data. The first part, to manage the mapping with the physica object, could be something like:
    public class ActionMap
    {        
        public eGameActions mActionType;
        public string mActionName = "";
        public eGameActionCategories mCategory = eGameActionCategories.None;
        public DeviceState mDeviceState = null;
        public int mObjectOffset = -1;
       
   
And the second part, to store information about the read data, could have this shape:
        public int mCurrentValue = 0;
        public bool mIsFFAxis = false;
        private bool mReadAsImmediateData = false;
 
        public float mFormattedValue = 0;
        public float mCurrentValue01 = 0;
        public bool mCurrentValueBool = false;
 
        private int mRangeMin = 0;
        private int mRangeMax = 0;
        private bool mInvertReading = false;
        private eBoolBase mBoolBasedOn = eBoolBase.RangeMax;
 
What is all that information? First variable is, of course, the current or last read value. It is an int as every DInput value is read as integer. Second value tells us if this action is mapped to an analog object with Force Feedback enabled. Third value will allow us to configure this specific action to be read as Immediate (instead of buffered, the default behaviour).
Starting from there, I´d recommend you to store another versions of the data. FormattedValue, for example. It is useful to provide this container to your application, so it can transform the read data as you want it, storing the result there for your comfort. It is very common to have other typical formatting of your data too, like the value expressed in the range 0..1, or expressed as a boolean (useful for buttons).
In order to make this conversions, you will need another step.

PART 5: Action calibration

Why every Controller Configuration has a Calibration step? Because you cannot know the range of the object the user selected for an Action. Analog objects, for instance, like pedals, joysticks or steering wheels, usually report an integer value between 0 .. 65535. But some of them will use other ranges. Buttons are retrieved as int too, with the values 0 or 128 only. To make things even worse, objects are sometimes read as inverted, what means that a button can be reported as 0 when un-pressed and 128 when pressed, or just the opposite. The same for analogs.
So, it´s clear that you need calibration, a way to know the valid range for objects and if they have to be read as inverted or not. I´d suggest you to store those values in mRangeMin, mRangeMax, mInvertReading. With that information, you have all you need to transform the int value read to the range 0..1.
The last thing we need is a way to convert it to boolean, so we can quickly check from our application if a button is pressed or not, for example, without having to worry about it´s range, inverted property, or anything. What I usually do here is to define what to compare the int value to, to decide if its pressed (boolean = true) or not (bool = false). You can do this in many ways, but I like to use an enum for such purpose:
public enum eBoolBase
{
    RangeMax,
    RangeMin,
    Zero,
    NotZero,
}
Using this, you can make an Action to be true when it reached it´s max range value, or when it´s non-zero, or whatever you want.

PART 6: The whole ActionMap

The whole Action Map for our application could be handled by a structure like the following (make your own for your purposes):
Dictionary<DeviceState, Dictionary<int, List<ActionMap>>>
Or you can have the reverse, indexing first by the ActionMap, and taking the Device and Object´s Offset later. Choose your favorite option.
Then, just define the ToXml() and FromXml() methods to store and recover all your configuration. The best place to store this configuration is the ApplicationData special folder. This way, the config will be made for every machine the application is installed, keeping a different configuration for each Windows user.To save the settings, just loop for every device in your structre saving it´s Guid, and a list of actions, just as we´ve seen before.
To read the settings, just load the xml file, loop through it´s nodes, and do the following:
  1. Recover a GameAction based on it´s name: Just as we said earlier, use Enum.Parse ( typeof( eGameActions), name);
  2. Recover a device instance by it´s Guid: Just loop throught the Available Devices searching one with the same guid.

PART 7: Updating your data at runtime

Once per frame, a DoSteps / OnFrameMove / Update / whatever you like method should be called to update all the data. It should do something similar to this:
                // Read Buffered Data
                foreach (Device dev in this.mActionMap.Keys)
                {
                    dev.Poll();
                    BufferedDataCollection coll = dev.GetBufferedDate();
                    if (coll == null)
                        continue;
                    foreach (BufferedData bdata in coll)
                    {
                        if (deviceActions.ContainsKey(bdata.offset))
                        {
                            // Action is mapped. Save it´s value. Axis will report integer (usually 0..65535) and
                            // buttons will report integer (0 or 128)
                           
                            bdata.Data is what you need
                        }
                    }
                }
                // Read Immediate Data
                foreach (DeviceState st in this.mDeviceStates)
                {
                    foreach (List<ActionMap> lista in dic.Values)
                    {
                        foreach (ActionMap action in lista)
                        {
                            if (!action.ReadAsImmediateData)
                                continue;
 
                            // Use action.Offset to access the JoystickState structure
                        }
                    }
                }

PART 8: User configuration of the Action Map

DirectX Action Mapping has it´s own user interface to configure the mapping. It´s dark, misterious, ugly, unconfortable, strange, a little bit chaotic, uncustomizable, and as we are no longer using standard Action Mapping we can no longer use it. So, make your own config dialog, with the appearance you want, and the behaviour you want.
Now, with your custom action mapping, making a new assignment is as easy as changing Action.PhysicalDevice and Action.PhysicalObjectOffset properties.
Listening to a device
Most of the games makes a controller configuration based on "Listen for any device´s object moving". If that happens, object is assigned to game´s action. In the config dialog, there will be a list of available game actions. When user selects one and press the "Assign" button, the application should stay for a while listening for devices. To do so:
  1. Define a Timer object in your configuration dialog, which is started when the user presses the "Assign" button.
  2. Set the timer to fire up every 100 ms or so. In the Timer_tick event, do the actual "listening" process:
    1. Increment a Time Counter. If it reaches the amount of time for listening, get out.
    2. Loop through every device
    3. Make device.GetBufferedData ()
    4. Assign first retrieved data to selected GameAction
In this algorithm you should also apply a Thresold, because analog devices are almost always reporting small changes. So keep track of the first values returned in BufferedData for every physical object and when newer values come, calculate the difference between actual and first value. If the difference is bigger than Thresold, make the assignment.
Take Care!

Bring old MSDOS applications to life in Windows Vista

Some days ago, a friend asked for my help with a problem. He bought a brand new Dell laptop with Vista installed on it. He is retired now, but he has been a consultant and manager for many years. During his life, he worked a lot with Open Access 4, and he currently has lots of files and data bases he wants to keep.

The problem is that MSDOS applications compatibility in Vista has been remarkably degraded, compared to XP. Open Access worked, but tooooooo slow and with no support for full-screen mode… No matter what the application settings were (compatibility mode, admin. privileges, etc). After some days investigating, I´ve found a very interesting project that solved all my problems: DOS Box.

DOS-Box is an X86 emulator with a built-in MSDOS version. It has been designed to allow playing old games again, with sound, decent fps, and in full-screen. There are even GLIDE and OpenGL enabled versions out there. You can download it and make a donation if you want here. How to use it? Easy, install and run, or plug and play if you prefer.

The only thing you have to do to make it work is to mount virtual units to access your disks. Just like this:

“mount VirtualUnit RealDirectoryToMap”

Example: “mount H: C:\EyeOfTheBeholder”

Automatic application launching using a FrontEnd

If you don´t wont to deal with mounting drives, and all that stuff, you can use a FrontEnd application for DosBox, many of them also available from the download link. I have tried DosShell and works pretty well.

Main window


Just install it and configure the DosBox path: Edit –> Preferences –> DosBox Folder. Then click on the “plus” icon to add shortcuts to your applications.

A quick note: After adding my first application, I got an error when trying to launch it, something like: “DosBox configuration file not found”. To fix it, just enter DosBox (double clicking its icon), and type the following command:

CONFIG -WRITECONF dosbox.conf

Hit return, and now it should work.

Enjoy!