Strange physics or math results since August 2009 release of SlimDX

Logo

If you use the magnificent SlimDX (something that you should definitely do), and have been experiencing strange issues with maths or physics, keep reading.

Quaternion Multiplication Issue

As you probably know, Quaternion multiplication is not commutative. This means that “a*b” is not the same than “b*a”.

It seems that XNA and D3DX implement this algorithm in exactly the opposite way, so for the operation: Multiply(Quaternion left, Quaternion right), one does left*right and the other does right*left.

Since the August 2009 release of SlimDX, they changed the way this operation was being done, as they thought they were previously doing it wrong. That’s why you might be getting strange maths or physical results if you install any version newer than March 2009.

I write this post because, believe me, this kind of errors are pretty difficult to trace (if you don’t pay the needed attention to Release Notes, as we did). In our case, we were suddenly getting erratic Rigid Body behavior, but everything else seemed to be working fine.

Of course, the first reaction was to think that some change in our code was to blame. It was obviously something related to maths, vector operations or matrices maybe, but after checking everything for some time, we saw no change related to that.

Then we realized it had something to do with the SlimDX update, so we started checking all the changes done to the library since March 2009, looking for changes in Math code. et voilá: revision 1199: Quaternion multiply was backwards. That was making our rigid bodies go crazy…

We should definitely read the Release Notes of each new version better next time.

Warning

According to this issue, the SlimDX team is changing the method again (back to the old way) in the next June release. So pay attention to the change.

Cheers!

XNArkanoid for Windows Phone 7

A few weeks ago I started a Windows Phone 7 port of my old XNArkanoid.

02 

It’s a C#-XNA remake of the classic Taito’s Arkanoid. This version is written in XNA 4.0 for Windows Phone. It’s not finished yet, but you can find all the information and source code at CodePlex:

arkanoidlogo original  http://xnarkanoid.codeplex.com

Targeting C++/CLI Projects to .Net Framework 3.X in Visual Studio 2010

If you work with C++/CLI projects, and recently jumped to Visual Studio 2010, you have probably noticed that Visual Studio re-targeted your project to .Net Framework 4. This is the default behavior when converting C++/CLI projects to VS2010, as some of its C++ compiler tools are only compatible with .Net Framework 4.

The problem is that sometimes you cannot jump to .Net 4 yet. Maybe because customer’s restrictions, maybe because compatibility problems with 3rd party tools, whatever… If that’s your case, you need to target to .Net Framework 3.0 or 3.5, and still want to use VS2010, you can do the following:

(Source: here and here and even better here)

1.- Change the target Framework of your project

On a C# project, you can select the target Framework by simply changing a value in a combo box. On a C++/CLI project, you will find this in the project properties page:

It´s just a read-only value, that you cannot change directly. To change it, you must edit the project´s file (.vcxproj). To do so, open it in the notepad, or better, use the new feature included in VS2010: Edit project file by right-clicking in the project and selecting the following menu entry:

image

You will end up with an xml view of the file. Search for a node called PropertyGroup. As a child node of this one, you should create another one with the form:

<TargetFrameworkVersion>v4.0</TargetFrameworkVersion>

It might already be there or not. If it’s not, create it. If it is, just edit its value, setting the target framework version you want: v3.0, v3.5, etc, ending with something like this:

image After the change, the project properties page will reflect the new target framework

2.- Reload the project

After any change in project’s file, you will need to reload it, by closing and re-opening the solution, or by selecting “Reload Project” in the context menu of VS.

3.- Install Visual Studio 2008 SP1

If you remember, we said that the VS2010 C++ compiler tools were not compatible with any Framework other than 4.0. That’s why as soon you change the target Framework and recompile, VS2010 will try to use the C++ compiler tools of Visual Studio 2008. If they are not present, it will stop the compilation with an error, requesting you to install VS2008.

Just a quick note: you need to install also the Service Pack 1 to VS2008.

4.- Issues

In my case, and with my specific project, the Microsoft C++/CLI Optimizing Compiler crashed if I targeted the project to .Net Framework 3.5. I really didn’t investigate why, as I really wanted to target v3.0 and didn’t have much time. Targeting v3.0 worked just fine.

So if you find the same error and find the reason or a solution, please comment!

Cheers!

Dependency error on Visual Studio 2010 Setup project

Since I moved to Visual Studio 2010, I have had several issues with Setup Projects. They convert from 2008 just fine, but I have detected some misbehaviors, specially related to DLL dependencies.

This morning, I came to a situation where Visual Studio always detected a DLL dependency which should not exist anymore. I tried marking the dependency as non-vital, excluding it. Nothing worked. My EXE file no longer depends on that DLL, but it was still there, and as it was an automatically detected dependency, I could not delete it. I tried even to set the DLL in the proper location (where Visual Studio was supposedly searching for it), but it didn’t work either. Visual Studio was still complaining about DLL not found.

The only thing that seemed to work momentarily was re-adding the EXE file that supposedly was dependant on that DLL. That fixed the DLL not found errors, but then appeared another one: “Unable to update the dependencies of the project”.

Searching a bit about this last message, I’ve found this post talking about garbage in project’s dependencies. Clayton James explains how to get rid of that error, cleaning the project by yourself in notepad. I found that information very useful.

However, in my specific case, it was not necessary to wipe all the Hierarchy and Files nodes (what wipes your solution too, making you to re-add all your files to your setup project). In my case it was enough with removing the references to the conflicting DLL from the Files section. That made the trick.

Hope it helps.

Getting audio from your computer to your TV Speakers… a usual headache…

Taking the audio signal from your computer to your LCD/LED screen speakers is sometimes very easy, and sometimes quite tricky, depending on the model and builder of your graphics card. If you want to do so, there are several things you should be aware of:

First, you should know that nowadays this operation is possible both through HDMI and DVI ports, as today's graphics cards can take audio out from DVI ports too (using a DVI-HDMI cable or an adaptor).

Second, remember that you have two options to take audio from your computer to the LCD screen:

1.- Use external analog audio through a Jack-Jack or Jack-RCA cable (depending on the analog audio input of your screen)

2.- Use digital audio through the HDMI cable (available on every screen)

If you want to use the first option, you will need to configure your computer to use the Speakers as the default audio device. If you select the second option, you will want to set your Digital HDMI audio device as default.

Where to do so? In Start->Control Panel->Sound:

image

The good thing about second option is that it uses just one cable for both audio and video, but in Both options you will have to deal with other configuration issues to make them work with the TV Speakers:

Different audio behaviors depending on HDMI input port

TV Screens usually include several HDMI input ports, and they behave differently regarding audio input. The typical options are:

  • HDMI port only: The TV will try to get audio from HDMI cable only
  • HDMI/DVI port: This kind of HDMI input usually has a external Jack or RCA audio input just by it. The thing is that some TVs will always take audio from that external jack, and some will decide when to get audio from HDMI or from those external Jack/RCAs automatically, and this is the most usual cause of problems.

In those that make this decision automatically, when they decide one option or the other? If the computer is “telling” the TV that the HDMI cable has audio, the screen will take audio from there. If not, it will take audio from the external Jack/RCA.

So, if you want audio to go through an external analog jack-jack cable, HDMI should carry NO AUDIO (so the screens takes audio from the external cable).

Now, next step is: how to control when the computer sends audio through HDMI or not?

Controlling the presence of audio in the HDMI cable

This task is to be managed by the graphics card, as it’s the graphics card who put signal on the HDMI cable. So, you will need to go to the nVidia Control Panel to adjust this option (under the Change Resolution tab). If the graphics card detects the presence of a HDMI or DVI cable, it will offer the possibility to enable or disable Audio on the wire (see next picture):

image

This is what tells the TV if the cable carries audio or not. It sometimes happens that you change this option, click apply and the screen doesn’t detect the change. If that’s your case, force the screen to notice by switching to a different resolution, and then switching back to the original one, with the selected audio option. You normally can tell if the screen noticed the change by a small blink or by the screen going black for a moment.

I don’t want two wires… HDMI audio rocks!

So, you want audio to go through HDMI? Good option…. Let’s see how to do it:

We already know the basic steps:

  • Set your HDMI (not the speakers) as default audio device (Start->Control Panel->Sound)
  • Set your graphics card to enable audio on HDMI (nVidia control panel)
  • Connect your HDMI cable to a HDMI input port of your screen (if you want to avoid problems, better select a normal HDMI input, not the HDMI / DVI).

There is an additional step needed for this:

Connecting the S/PDIF cable

Didn’t you ask yourself how is it possible that graphics cards take audio out through the HDMI cable? The S/PDIF cable (Sony/Philips Digital Interconnect Format) is the answer. It will take digital audio from your motherboard (taken from a standard interface with the sound card) to the graphics card, and the graphics card will output it to the HDMI cable. This cable is usually a very small, two pin cable, supplied with your graphics card:

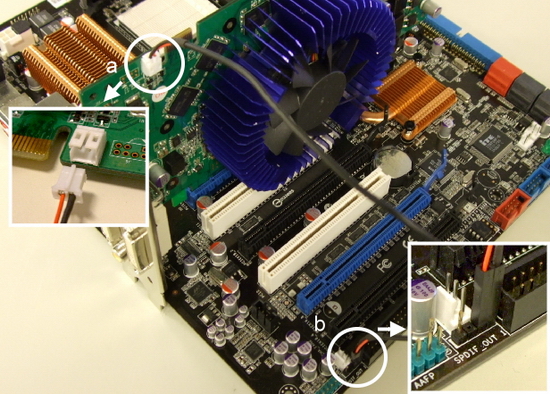
See your motherboard and graphics card’s manuals to locate the two pins where to connect the cable. They are also usually marked in the board with labels like: SPDIF or AUDIO. The following are some examples:

image

A unusual case: The Point Of View GeForce GTX 260

This last week, we acquired a Point Of View GeForce GTX 260, just like this one:

P1000197

We had to invest quite some time in order to make audio work with this card:

1.- The card came with a SPDIF cable, and although the manual mentions the possibility to use it, it didn’t specify where to connect it. There are two free pins in the card but it doesn’t say SPDIF or AUDIO anywhere. Initially, they seem to be some kind of jumpers, as they are marked as JP0 and JP1.

2.- So, we tried using external analog jack-jack, but the nVidia latest driver (197.45) seemed to fail disabling HDMI audio on this card, so our Samsung LCD screen always selected HDMI audio as source. No luck…

3.- As nothing worked, we decided to take the risk and to connect the SPDIF cable to those JP0 and JP1… et voilá! That did the trick. Now we have digital audio running on HDMI.

No manual, specs or information we could found on Point Of View will tell you where to connect the SPDIF cable, so for your reference, here is how you should connect it (white on the right, red on the left, from this perspective and with this connection on the motherboard):

P1000196

Hope it helps.

Take Care!

Integrate CopySourceAsHTML into release version of VisualStudio 2010

CopySourceAsHTML is one of the most useful tools for developers who blog or post code in any form. Now that Visual Studio 2010 is out, it’s time to integrate both tools.

They released a patch and a new version which technically supports 2010, but it was released for the beta version (I guess), and now it doesn´t integrate well with the release version. As Sean mentions in his blog, all you need to do is:

1.- Download CopySourceAsHTML from here

2.- Install it normally, selecting VS 2010 support (it won´t register well in the program though).

3.- Go to the CopySourceAsHTML installation directory, typically:

C:\Program Files (x86)\J.T. Leigh & Associates\CopySourceAsHtml

4.- Copy the contents of the folder

5.- Find what folder is VStudio using for storing the AddIns (there is more than one), in Tools->Options->Add in/Macros Security. Typically (you might have to create this folder):

C:\ProgramData\Microsoft Visual Studio\Addins

6.- Paste the addin file there, re-launch VStudio, and make sure it’s enabled:

Add-in Dialog

7.- Open the file "CopySourceAsHtml.2010.AddIn” and open it with a text editor (it´s an XML file). In every entry <version>9.0</version>, replace the “9.0” with a “10.0”.

And that´s it!

Best video player for Windows Mobile PocketPC

After testing CorePlayer and some others, I have to say that I moved back to TCPMP again. CorePlayer is great, and it´s greatly optimized for handheld devices, but lacks AC3 audio support.

TCPMP on the other hand, although it has been deprecated, perfectly supports AC3 and many other formats, and is still the best player for WM devices.

There is a recomp version specifically compiled for Windows Mobile 6.1 that works flawlessly, and includes most of the plugins available.

You can download from here:

http://www.htcmania.com/showthread.php?t=51241

Don´t worry, it´s free.