Mostrando entradas con la etiqueta Windows Phone 7 Games. Mostrar todas las entradas

How to install Windows Phone 8.1, even with no developer account

If you can't wait to have Windows Phone 8.1 and Cortana, you can have it right now.


As you might have read, all you need to do is search in the Store for the application: Preview for Developers, install and open it. It opens the door to the set of updates that will trigger the installation of Windows Phone 8.1.

The thing is that one of the steps when opening it require you to enter your Live Account credentials, and in theory you must be registered as a Developer in the Windows Phone Dev Center.

Sincerely, you should consider register as so if you plan to do any development... It's only $14 yearly... But if you don't want to pay, there is a way:

1.- Go to http://appstudio.windowsphone.com
2.- Log in with your non-developer Live Account ID, and accept all the terms and conditions
3.- Click in "Start New Project"
4.- Select whichever project template you prefer (empty app will do the trick), and complete the process.

Now, you should be able to run the Preview for Developers thing, and it should accept your credentials as a registered developer.

Ta dá !!!

Disclaimer: Do this at your own risk. Windows Phone 8.1 is currently a developer preview and might contain bugs. I take no responsibility for any damage done to your phone or to your data, so better know what you are doing... :)


HLSL code editing in Notepad ++

There are several HLSL syntax highlight add-ins for Visual Studio out there, but if you prefer to use the great NotePad++ to author or edit your shaders, my fellow DirectX MVP Matt Pettineo has written a Notepad++ add-in to allow doing this.

You just need to download the HLSL.xml file from his GoogleDrive account, and in Notepad ++ click Language->Define Your Language->Import and then select the downloaded file. After restarting notepad++, you´ll find a new entry in the Language menu item like this:


By clicking in that new item when you load an HLSL file, you´ll get the following result:


According to him, it supports even SM 5.0 profiles.

Great job Matt !!! :)

Projecting a 3D Vector to 2D screen space, with automatic viewport clipping (DirectX, SlimDX or XNA)

Many times, you will need to know the 2D screen coordinates of a 3D world position. DirectX already includes methods to perform vector projections, taking into account the needed World, View and Projection matrices, as well as the viewport scaling. It does not include however viewport clipping, as an additional feature in those methods.

Viewport clipping can be a tricky matter, and sometimes, you will need to rely on algorithms like the Sutherland-Hodgman algorithm, or the refined version specifically developed for 2D viewports: the Cohen-Sutherland algorithm. Those methods are especially appropriate when you are already dealing with 2D coordinates, or if you need to know the extra points or polygons generated when clipping is performed.

In our case however, we will only focus on finding the closest in-screen coordinates that correspond to an off-screen point, without dealing with any extra geometry or polygon sub-division. It’s important to note also that we will be working with 3D coordinates that go through a projection process (and finally getting 2D coords). This is relevant, as provides us with additional information we can use, and allows us to jump inside the algorithm and perform the clipping in the middle of the projection pipeline, instead of doing so at the end, when the coordinates are already 2D.

Resources like this, and this explain very well the processing of vertices in the Direct3D pipeline:

untitled

As you can see, each 3D position travels through different stages and spaces of coordinates: model space –> world space -> camera space –> projection space –> clipping space –> homogeneous space –> and finally: Screen Space.

Evidently, D3D also performs certain types of clipping to vectors, and you can tell by the above picture that clipping is done, (surprisingly), in clip space. We will try to mimic that behavior…

Note: Transforming coordinates with the MClip matrix, to go from projection space to clip space should be done only if you want to scale or shift your clipping volume. If you are ok with a clipping volume that matches your screen render target viewport (you will, most of the cases), you should leave this matrix as the Identity, or simply don´t perform this step. The below written algorithm has all this step commented.

Once our coordinates are in Clip Space (Xp, Yp, Zp, Wp), we easily perform the clipping by limiting their values to the range: –Wp .. Wp for the X and Y, and to the range: 0 .. Wp for Z.

After that, we just need to proceed with the normal Vector projection algorithm, as the resulting 2D coordinates will be stuck inside the screen viewport. An extra feature that should be nice to have, is a simple output variable that tells us if the coordinates were inside or outside the viewport.

A C# implementation of such an algorithm could be:

public static Vector2 ProjectAndClipToViewport(Vector3 pVector, float pX, float pY,
                                float pWidth, float pHeight, float pMinZ, float pMaxZ,
                                Matrix pWorldViewProjection, out bool pWasInsideScreen)
        {
            // First, multiply by worldViewProj, to get the coordinates in projection space
            Vector4 vProjected = Vector4.Zero;
            Vector4.Transform(ref pVector, ref pWorldViewProjection, out vProjected);

            // Secondly (OPTIONAL STEP), multiply by the clipMatrix, if you want to scale
            // or shift the clip volume. If not (most of the times you won´t), just leave 
            // this part commented,

            // or set an Identity Matrix as the clip matrix. The default clip volume parameters
            // (see below), will produce an identity clip matrix.

            //float clipWidth = 2;
            //float clipHeight = 2;
            //float clipX = -1;
            //float clipY = 1;
            //float clipMinZ = 0;
            //float clipMaxZ = 1;
            //Matrix mclip = new Matrix();
            //mclip.M11 = 2f / clipWidth;
            //mclip.M12 = 0f;
            //mclip.M13 = 0f;
            //mclip.M14 = 0f;
            //mclip.M21 = 0f;
            //mclip.M22 = 2f / clipHeight;
            //mclip.M23 = 0f;
            //mclip.M24 = 0f;
            //mclip.M31 = 0f;
            //mclip.M32 = 0;
            //mclip.M33 = 1f / (clipMaxZ - clipMinZ);
            //mclip.M34 = 0f;
            //mclip.M41 = -1 -2 * (clipX / clipWidth);
            //mclip.M42 = 1 - 2 * (clipY / clipHeight);
            //mclip.M43 = -clipMinZ / (clipMaxZ - clipMinZ);
            //mclip.M44 = 1f;
            //vProjected = Vector4.Transform(vProjected, mclip);
            
            // Third: Once we have coordinates in clip space, perform the clipping,
            // to leave the coordinates inside the screen. The clip volume is defined by:

            //
            //  -Wp < Xp <= Wp
            //  -Wp < Yp <= Wp
            //  0 < Zp <= Wp
            //
            // If any clipping is needed, then the point was out of the screen.
            pWasInsideScreen = true;
            if (vProjected.X < -vProjected.W)
            {
                vProjected.X = -vProjected.W;
                pWasInsideScreen = false;
            }
            if (vProjected.X > vProjected.W)
            {
                vProjected.X = vProjected.W;
                pWasInsideScreen = false;
            }
            if (vProjected.Y < -vProjected.W)
            {
                vProjected.Y = -vProjected.W;
                pWasInsideScreen = false;
            }
            if (vProjected.Y > vProjected.W)
            {
                vProjected.Y = vProjected.W;
                pWasInsideScreen = false;
            }
            if (vProjected.Z < 0)
            {
                vProjected.Z = 0;
                pWasInsideScreen = false;
            }
            if (vProjected.Z > vProjected.W)
            {
                vProjected.Z = vProjected.W;
                pWasInsideScreen = false;
            }

            // Fourth step: Divide by w, to move from homogeneous coordinates to 3D
            // coordinates again

            vProjected.X = vProjected.X / vProjected.W;
            vProjected.Y = vProjected.Y / vProjected.W;
            vProjected.Z = vProjected.Z / vProjected.W;

            // Last step: Perform the viewport scaling, to get the appropiate coordinates
            // inside the viewport

            vProjected.X = ((float)(((vProjected.X + 1.0) * 0.5) * pWidth)) + pX;
            vProjected.Y = ((float)(((1.0 - vProjected.Y) * 0.5) * pHeight)) + pY;
            vProjected.Z = (vProjected.Z * (pMaxZ - pMinZ)) + pMinZ;

            // Return pixel coordinates as 2D (change this to 3D if you need Z)
            return new Vector2(vProjected.X, vProjected.Y);
        }

Hope it helps !

Sonrisa

Memory limits in a .Net process

This article tries to be an introduction on .Net memory management and about the memory limits both the Runtime and the platform establish for each process. We will also give some tips about dealing with the problems you will face when reaching those limits.

Available memory for a process

As you already know, no matter how much physical memory you install in a computer. Your application will face several issues that will limit the actual memory available for it.
For instance, a 32 bit system cannot have more than 4 GB of physical memory. Needless to say that 2^32 will give you a virtual address space with 4.294.967.296 different entries, and that’s precisely where the 4GB limit comes from. But even having those 4GB available on the system, your application will actually be able to see 2GB only. Why?
Because on 32 bits systems, Windows splits the virtual address space into two equal parts: one for User Mode applications, and another one for the Kernel (system applications). This behavior can be overridden by using the “/3gb” flag in the Windows boot.ini config file. If we do so, the system will then reserve 3GB for user applications, and 1 GB for the kernel.
However, that won’t change the fact that we will be able to see only 2GB from our application, unless we explicitly activate another flag in the application image header: IMAGE_FILE_LARGE_ADDRESS_AWARE. The combination of both flags on a 32bit Operating System is commonly known as: 4GT (4 GigaByte Tuning).
Surprisingly on 64 bit environments, the issue is pretty similar. Even though these systems don’t suffer from the same limitations about physical memory or reserved address space for the kernel (in fact, in those systems the /3gb flag doesn’t apply), processes hit with the same wall when trying to address more than 2 GB. Unless the same flag is set for the executable (IMAGE_FILE_LARGE_ADDRESS_AWARE), the limit will be always the same by default.

Activating the flag: IMAGE_FILE_LARGE_ADDRESS_AWARE

  • In native, Visual C++ application, it’s pretty straightforward to set that flag, as Visual Studio have an option for that. You just need to set the /LARGEADDRESSAWARE Linker parameter, and you are ready to go.
  • In C#, .Net applications:
  1. Applications compiled as 64bit will have that flag set by default, so you will already have access to a 8TB address space (depending on O.S. versions)
  2. Applications compiled as 32bits will need to be modified with the tool called EditBin.exe (distributed with Visual Studio). This tool will set the appropriate flag to your EXE, allowing your application to access a 4GB address space if running in a 64bit Windows, or to a 3GB address space if running in a 32bit Windows with the 4GT tuning enabled.
Next table (taken from here), summarizes the limits in virtual address space, depending on the platform and on the kind of process we are running:
image
This page has much more info on the issue.

System memory limits. Closer than you expect

Nowadays, memory is cheap. However, as explained in the previous chapter, there are many situations where you will end up having only 2 GB available, despite the total amount of physical memory installed in your PC.
In addition to that, if your application is being developed in .Net, you will find that the Runtime itself introduces a remarkable memory overhead (around 600-800 MB). So, it’s not strange to start receiving OutOfMemory exceptions when reaching 1.2 or 1.3 GB of memory used. This blog talks further about this.
So, if you are not in one of those cases, where the address space is expanded beyond 2 GB, and your are developing in .Net, your actual memory limit will be around 1.3 GB.
That’s more than enough for 99% of applications, but others, like intensive computing apps or those related to databases, may need more. Way more…

And things get even worse…

To make things even more complicated, you will soon learn that one thing is having some amount of memory available, and another, completely different story is to find a contiguous block of memory available.
As you all know, as a result of O.S. memory management, techniques like Paging and the creation and destruction of objects, memory gets more and more fragmented. That means that even though there is a certain amount of free memory, it is scattered through a bunch of small holes, instead of having a single, big chunk of memory available.
Modern Operating Systems and the .Net platform itself apply methodologies to prevent fragmentation, like the so called Compaction (moving objects in memory to fuse several free chunks of memory into a single, bigger one). Although these techniques reduce the impact of fragmentation, they do not eliminate it completely. This article describes in detail the .Net Garbage Collector (GC) memory management, and the compaction task it performs.
In the context of this article, fragmentation is a big issue, because if you need to allocate an 10 MB contiguous array, even if there’s 1 GB of free memory available for your process, you will receive an OutOfMemory exception if the system cannot find a contiguous chunk of memory for the array. And this happens more frequently than you may expect when you deal with big arrays.
In .Net, fragmentation and compaction of objects is tightly related to object’s size, so let’s talk a bit about that too:

Allocation of big objects

Maybe you don’t know it, but all versions of .Net until the last one (1.0, 2.0, 3.0, 3.5 and 4.0) have a limit on the maximum size a single object can have: 2 GB. No matter if you are running in a 64bit or 32bit process, you cannot create anything bigger than that, in a single object. It’s only since version 4.5 when that limit has been removed (for 64 bit processes only). However, besides very few exceptions, you are very likely applying a wrong design pattern to your application if you need to create such a big objects.
In the .Net world, the GC classifies objects into two categories: small, and large objects. Where you expecting something more technical? Yeah, me too… But that’s it. Any object smaller than 85000 bytes is considered small, and any object larger than that is considered large. When the CLR is loaded, the Heap assigned for the application is divided into two parts: the SOH (Small Objects Heap) and the LOH (Large Objects Heap). Each kind of object is stored on it’s correspondent Heap.
It’s also remarkable to say that Large object’s compaction is very expensive, so it’s directly not done in current versions of .Net (developers said that this situation might change in the future). The only operation similar to compaction done with Large objects is that two adjacent dead objects are fused together into a single chunk of free memory, but no Large object is currently moved to reduce fragmentation.
This fantastic article has much more information about the LOH.

C# Arrays when reaching memory limits

Simple Arrays (or 1D arrays) are one of the most common ways of consuming memory in C#. As you probably know, the CLR always allocates them as single, contiguous blocks of memory. In other words, when we instantiate an object of type byte[1024], we are requesting 1024 bytes of contiguous memory, and you will get an OutOfMemory exception if the system cannot find any chunk of contiguous, free memory with that size.
When dealing with multi-dimensional arrays, C# offers different approaches:

Jagged arrays, or arrays of arrays: [][]

Declared as byte[][], this is the classical solution to implement multi-dimensional arrays. In fact, it’s the only approach natively supported in languages like C++.
With regards to memory allocation, they behave as a simple array of elements (one block of memory), where each one of them is another array (another, different block of memory). Therefore, an array like byte[1024][1024] will involve the allocation of 1024 blocks of 1024 bytes memory each.

Multi-Dimensional Arrays: [,]

C# introduces a new kind of arrays: multi-dimensional arrays, declared like byte[,].
Although they are very comfortable to use and easy to instantiate, they behave completely different with regards to memory allocation, as they are allocated in the Heap as a single block of memory, for the total size of the array. In the previous example, an array like byte[1024, 1024] will involve the allocation of one single, contiguous block of 1 MB.
In the next chapter we will make a quick comparison of both types of arrays:

Comparison: [,] vs [][]

2D array [,] (allocated as a single block of memory):
Pros:
  • Consumes less memory (no need to store references to all N blocks of memory)
  • Faster allocation (allocating a bigger, single block of memory is faster than allocating N, smaller blocks)
  • Easier instancing (enough with one single line: new byte[128, 128])
  • Useful tool methods, like GetLength(). Cleaner and easier usage.
Cons:
  • Finding a single block of contiguous memory for them might be a problem, specially if dealing with big arrays, or when reaching memory limits for your process
  • Accessing elements in the array is slower than in jagged arrays (see below)
Jagged arrays [][] (allocated as N blocks of memory):
Pros:
  • It’s easier to find available memory for this kind of arrays, because due to fragmentation, it’s more likely that there will be N blocks of smaller size available than a single, contiguous block of the full size of the array.
  • Accessing elements in the array is faster than in 2D arrays, mostly because the optimizations in the compiler for handling simple, 1D arrays (after all, a jagged array is composed of several 1D arrays).
Cons:
  • Consumes a bit more memory than 2D arrays (need to store references to the N simple arrays).
  • Allocation is slower, as it needs to allocate N elements instead of a single block
  • Instancing is uncomfortable, as you need to loop through array elements to instantiate them too (see below for tip)
  • Doesn’t provide with tool methods, and might be a bit more complex to read and understand
This blog have a great comparison about them too.

Conclusion

Each user should decide which kind of array fits best the specific case he is dealing with. However, a developer that usually needs big amounts of memory, and who cares more about performance than comfort, ease of use or readability, will probably decide to use Jagged arrays ([][]).

Tip: code to automatically instantiate a 2D, jagged array

Instancing a multi-dimensional jagged array can be disturbing, and repetitive. This generic method will do the work for you:
        public static T[][] AllocateArray2D<T>(int pWidth, int pHeight)            
        {
            T[][] ret = new T[pWidth][];
            for (int i = 0; i < pHeight; i++)
                ret[i] = new T[pHeight];

            return ret;
        }
Hope it helps !!

Boot time comparison: All generations of iPhone vs Nokia Lumia 800

This video completes the boot time comparison made by iClarified with an additional contender: the Nokia Lumia 800 with Windows Phone 7.5, which beats even the very last iPhone 5 in terms of boot time.


Please note: This video is a second version of another one published 3 days ago. It has been remade to fix a small fps conversion error present in the previous version (the iPhone part was treated as if it was 30 fps, when it was 24 fps). That involved it being displayed faster than it should, and therefore showing a wrong boot time measurement for the Lumia (which was displayed correctly, at 30 fps). Nokia Lumia 800 boots in 18 seconds, not 22.

Results

The boot time results are awesome:

          • Nokia Lumia 800: 18.17 secs
          • iPhone 5: 24.88 secs (6.5 seconds slower !!)

I ♥ Nokia        -        I ♥ Windows Phone

A highly recommendable Windows Phone 7 game development book…

If you want to start, or become an expert on Windows Phone 7 game development using XNA, I´d highly recommend you to buy a.s.a.p the following book:

http://www.amazon.com/Professional-Windows-Phone-Game-Development/dp/0470922443

It´s written by two masters of XNA and fellow MVPs Chris Williams and George Clingerman, and they did a really really good job.

What are you waiting for? Go get it !!

Desarrollo de videojuegos para Windows Phone 7. Conferencia en Zaragoza

Este próximo miércoles día 30, estaré en Zaragoza dando una charla sobre Desarrollo de Videojuegos para Windows Phone 7. Podéis encontrar más detalles del evento aqui:

http://www.cpilosenlaces.com/site/pages/jornadas-tE9cnicas.php

Y descargar el PDF del mismo aqui: jornadas_tecnicas.pdf

Saludos!

Gravitards for Windows Phone 7

Today, Gravitards has been finally released for Windows Phone 7.

“Gravitards is a skill-based game with amazing graphics and real physics, where you have to drive a ball through many different levels, reaching the end zone (or “gravitard”), without dropping it, while collecting rings distributed all around. You´ll find obstacles, moving parts, force fields, guillotines, ramps, jumps, and even a pinball table to play with. Test yourself by controlling the ball with your device’s accelerometer, with on-screen buttons, or with the keyboard, and get the needed practice to complete all the levels.”

You can download Gravitards directly to your Windows Phone 7 using the following Zune link.

Some other videos and pictures:


Captura36

Captura38

Captura3

Hope you all like it!!!

Ofuscación de código y activación de informes en aplicaciones Windows Phone 7

Nota: Este post es una traducción personal (reconvertida en tutorial) de las explicaciones dadas por Bill Leach (CTO de Preemptive Solutions), en este vídeo grabado para Channel 9.

Introducción

En este artículo se describen los pasos necesarios para proteger el código fuente de aplicaciones Windows Phone (tanto XNA como Silverlight), e incluir en ellas la generación de informes sobre su utilización.

Para ello, se utilizará la herramienta Dotfuscator Windows Phone Edition en su versión 4.9, recientemente lanzada por Preemptive Solutions en colaboración con Microsoft.

En primer lugar, es necesario registrarse y descargar la herramienta desde esta página web. Una vez se recibe por email el número de serie necesario para activar el programa, solo resta lanzar la aplicación: Inicio –> Programas –> Preemptive Solutions –> Dotfuscator.

Interfaz de usuario

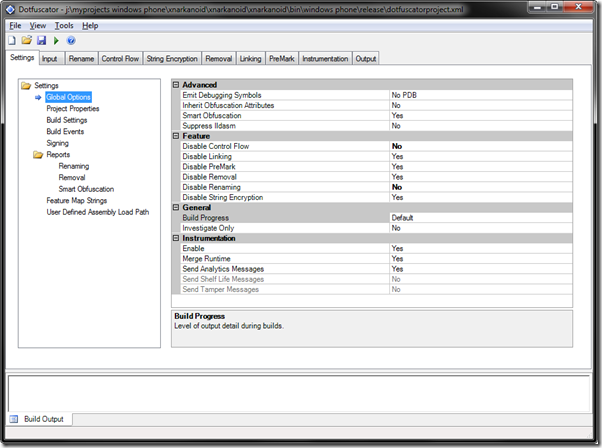
Aunque Dotfuscator Professional puede integrarse dentro de Visual Studio 2010, como un tipo de proyecto más, Dotfuscator Windows Phone Edition es una aplicación independiente, con su propio interfaz de usuario:
image

Como puede apreciarse en la imagen, el funcionamiento es sencillo. Consta de:

  • Menú principal y barra de herramientas con las opciones típicas para cargar y salvar un proyecto de ofuscación
  • Botón con el símbolo de Play en verde, en la barra de herramientas, el cual comienza la ofuscación del código que se haya seleccionado y genera las versiones protegidas de los ensamblados o programas.
  • Pestañas de configuración:
      • Settings: Configuración general de la aplicación
      • Input: Selección de qué ensamblados o ejecutables queremos proteger en el proyecto.
      • El resto: propiedades de configuración para cada una de las funcionalidades que ofrece Dotfuscator

Añadiendo ensamblados o ejecutables

Para empezar a trabajar, lo primero es indicar a Dotfuscator qué ensamblados o ejecutables debe proteger. Para ello, solo hay que ir a la pestaña Input y pulsar sobre el icono de abrir carpeta. Aparecerá el clásico cuadro de diálogo de selección de archivos, donde es posible seleccionar:

      • Ensamblados (librerías) de tipo .DLL
      • Ejecutables (aplicaciones) de tipo .EXE
      • Paquetes de despliegue de Windows Phone (contienen librerias DLL, contenidos, etc), de tipo .XAP. Esta será la opción que se utilizará en el ejemplo que nos ocupa.

Nota: Si, como es el caso, estamos trabajando con proyecto Windows Phone (y archivos XAP), Dotfuscator solo trabajará con los ensamblado que encuentre en dichos archivos. Los contenidos no serán protegidos ni modificados en absoluto.

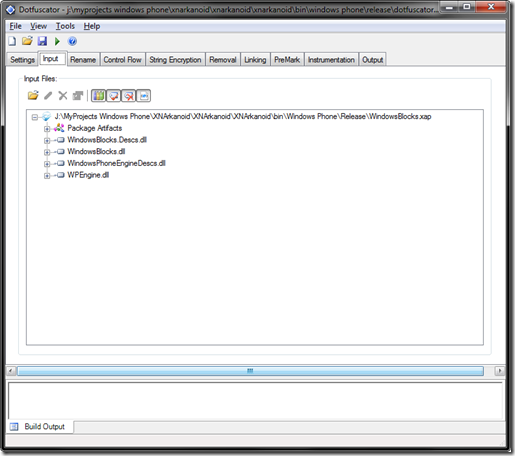
Una vez se selecciona el paquete XAP a proteger, aparecerán sus contenidos en la ventana inferior, en forma de árbol desplegable:
image

Si se despliega cualquiera de las DLLs del paquete, aparecerán algunas propiedades de ofuscación activadas, en forma de CheckBoxes. Una de las más relevantes, según los objetivos que persigue este artículo, es la llamada Library:

image

Manteniendo esta opción marcada (viene marcada por defecto), Dotfuscator deja todos los nombres de los tipos y métodos públicos sin renombrar (sin ofuscar). Los tipos privados sí se renombrarán, y todo el contenido de los métodos se ofuscará, pero los nombres que sean visibles desde fuera permanecerán inalterados.

Esto es necesario cuando una librería, a pesar de estar ofuscada, va a ser utilizada por cualquier otro software después. Si se cambiaran los nombres de los tipos públicos, el interfaz de la librería sería distinto, por lo que dejaría de ser utilizable desde fuera.

Output de la aplicación

Dotfuscator genera versiones protegidas de lo que se selecciona en la pestaña Input:

  • Para ensamblados (DLL), genera DLLs protegidas
  • Para ejecutables (EXE), genera EXEs protegidos
  • Para paquetes Windows Phone (XAP), genera paquetes XAP protegidos

Por defecto, el directorio de salida es el mismo donde se encuentra el ensamblado de entrada, más una sub-carpeta creada por el programa con el nombre Dotfuscated. No obstante, este comportamiento se puede cambiar en la pestaña Settings -> Project Properties -> ConfigDir.

Aplicando una protección básica

Una vez se han seleccionado los Inputs del proyecto, es necesario seleccionar qué tipo de protección ha de aplicarse.

Aunque cada tipo de protección puede ser configurada en profundidad (en sus respectivas pestañas), pudiendo incluso aplicar comportamientos distintos para cada método o propiedad, primero se aplicará una configuración genérica en la pestaña Settings.

Por defecto, todas las protecciones están deshabilitadas, apareciendo de la siguiente forma:

  • Disable Control Flow: Yes
  • Disable Linking: Yes
  • Disable PreMark: Yes
  • Disable Removal: Yes
  • Disable Renaming: Yes
  • Disable String Encryption: Yes

image

Para una protección básica, lo indispensable es activar la ofuscación de Control Flow y el Renaming. En algunos casos, también puede ser interesante activar el String Encryption, sobre todo si la aplicación a proteger contiene strings con contenido sensible.

Para activar cada funcionalidad, debemos indicar a Dotfuscator que NO las deshabilite, es decir, poner valores como: Disable Control Flow: No y Disable Renaming: No.

Control Flow

La ofuscación del flujo de control se encarga de hacer más difícil la comprensión del código, mediante cambios en el flujo del programa. Aunque el resultado final siga siendo equivalente, a nivel funcional, hace cambios para que no sea nada obvio interpretar por donde va a transcurrir la ejecución, y así dificultar las tareas de ingeniería inversa.

Renombrado

El renombrado se encarga de cambiar el nombre a todos los tipos privados, cambiando los descriptivos nombres originales por valores como: “a”, “b”, “c”, etc. En la pestaña Renaming se pueden excluir a mano, uno por uno, métodos o propiedades que explícitamente se quieran dejar fuera del renombrado. No obstante, para un uso básico, esto normalmente no es necesario.

Con estas funcionalidades activadas, ya se cuenta con una protección básica del código fuente. Ahora se describirá como incluir informes en aplicaciones Windows Phone.

Añadir instrumentación, o Code Analytics

Además de protección y ofuscación, Dotfuscator puede añadir Instrumentación a los programas.

Ambas funcionalidades son independientes. Es decir, se pueden aplicar las dos a la vez, se puede aplicar protección pero no instrumentación, y vice-versa.

La instrumentación utiliza una plataforma de Preemptive Solutions denominada como: Runtime Intelligence. Lo que hace es inyectar en el programa que procesa ciertas líneas de código cuya misión es generar informes de uso del mismo cada vez que este se ejecuta, y subirlos al portal de Runtime Intelligence (u otro), al que cada desarrollador registrado tiene acceso protegido por nombre y contraseña.

Se trata de un comportamiento muy similar al que ofrecen otras plataformas de análisis en otros sectores, como Google Analytics para WebSites, blogs, etc.

La instrumentación se activa/desactiva desde la pestaña Settings, apartado Instrumentation (debemos dejar todas las opciones activadas –Yes-)

Identificando la empresa y la aplicación en los informes

Obviamente, el generador de informes debe saber para qué aplicación está reportando, y para que empresa. Ambas cosas se identifican en la pestaña Instrumentation.

En ella, es necesario expandir el nodo de la DLL que contenga la clase principal de la aplicación:

  • Para una aplicación XNA, será aquella DLL que contenga la clase de tipo Game
  • Para una aplicación Silverlight, será aquella DLL que contenga la clase App

Una vez desplegado dicho nodo, aparecerá una lista de atributos por defecto, como los de la siguiente imagen (para un ejemplo en XNA).

image

Para que la instrumentación funcione, es necesario añadirle dos más, pulsando con el botón derecho sobre el nombre de la DLL y seleccionando la opción: Add Attribute. Una vez hecho esto, se abrirá una ventana que pregunta el tipo de atributo a añadir, con una serie de valores predefinidos:
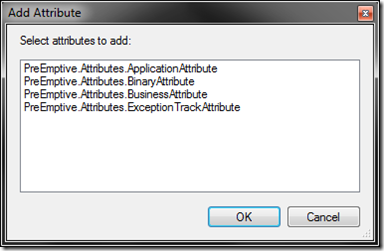
image

Los dos que hay que añadir son:

BusinessAttribute

Este atributo identificará a la empresa desarrolladora del software, mediante un Company Key único, proporcionado vía email por Preemptive Solutions cuando se efectuó el registro en el portal de Runtime Intelligence. También se puede encontrar en el Dashboard del portal una vez hecho login.

Resulta recomendable incluir además un nombre de empresa.

ApplicationAttribute

Para identificar la aplicación, es necesario proporcionar la siguiente información:

  • Application Type: Tipo de aplicación (se puede dejar en blanco)
  • Guid: Identificador del ensamblado principal de la aplicación. Debe ser único, ya que será utilizado en el portal para identificar a esta aplicación. En este campo se puede utilizar el Guid del proyecto, disponible en su Assembly Info (accesible en Visual Studio desde el Solution Explorer o desde la ventana de propiedades del proyecto –> Assembly Info).
  • Name: Nombre de la aplicación (se puede dejar en blanco, aunque no es muy recomendable)
  • Version: Versión de la aplicación (si se deja en blanco, el Reporter tratará de extraerla de los meta-datos del ensamblado).

Indicando dónde se debe inyectar el código

Para indicar a Dotfuscator dónde inyectar el código que genera los informes, solo hay que navegar (sin salir de la pestaña Instrumentation) un poquito hacia abajo, y expandir el contenido aún más la DLL de la parte inferior (en el siguiente ejemplo, la DLL Silverlight: WindowsPhoneApplication1.dll):

image

Expandiendo uno tras otro los sucesivos nodos, solo resta navegar hasta la clase principal de la aplicación.

  • En el caso de un juego XNA, ésta será la clase Game del juego
  • En caso de ser una aplicación Silverlight, ésta será la clase App
Informe de comienzo de ejecución

Para informar sobre el comienzo de una ejecución, se busca un método que se ejecute UNA SOLA VEZ en el proceso de inicialización.

En el caso de aplicaciones SilverLight, un candidato perfecto es el evento Application_Launching de la clase App. En caso de una aplicación XNA, una buena opción puede ser el método Initializing de la clase Game.

Una vez seleccionado el método, se pincha con el botón derecho sobre su nombre, y se selecciona la opción Add Attribute. De nuevo, se solicitará el tipo de atributo a añadir, aunque esta vez la lista de opciones es distinta:

image

El atributo a elegir esta vez es SetupAttribute, el cual tiene bastantes parámetros que se pueden dejar con sus valores por defecto. Aun así, cabe remarcar estos dos:

  • Custom Endpoint: En lugar de enviar los informes al EndPoint por defecto (el del portal de Runtime Intelligence), aquí se puede especificar otro EndPoint personalizado
  • Use SSL: Activa protección SSL para las comunicaciones
Generar los informes de comienzo en un thread aparte

Si la aplicación que estamos desarrollando tarda cierto tiempo en cargar (algo típico en juegos XNA), lo normal (o más bien lo recomendado) es tener la carga inicial de contenidos separada en un Thread aparte, para que mientras dicha carga se produce, se pueda mostrar un icono animado de tipo Loading…

En estos casos, es recomendable incluir la inyección del código de informes en dicho thread, por si la generación del report se demora un poquito por motivos de red, o cualquier otro (aunque no debería). De esta forma la experiencia de usuario no se verá entorpecida.

Si se observa el siguiente ejemplo, en el que se está protegiendo un juego XNA, dicho punto ejecutado en un thread aparte es el método denominado CreateAssets:

Informe de fin de ejecución

Si también se desea que los informes indiquen cuando se dejó de utilizar la aplicación, habrá que seguir un procedimiento muy similar, añadiendo un atributo a un método que se ejecute cuando la aplicación está terminando.

  • En el caso de juegos XNA, el método perfecto para esto es OnExiting, de la clase Game.
  • Para aplicaciones SilverLight, una buena opción es el evento Application_Closing, de la clase App

En este caso, el tipo de atributo a añadir es TearDownAttribute, el cual se puede dejar con sus parámetros por defecto.

Y con esto y un bizcocho, code-analytics a las ocho Guiño

New version of Windows Blocks (1.2) uploaded to Windows Phone MarketPlace

Captura5I have just uploaded the 1.2 version of Windows Blocks. It’s waiting for validation, and will be available soon (probably tomorrow). It fixes several bugs found in the game, especially related to slow response of the main menu.

Hope you all like it!


Cheers.

Microsoft Coding Camp – Imagina Windows Phone 7

CODING CAMP- IMAGINA WINDOWS PHONE 7Este próximo fin de semana, Javier Cantón, creo que Vicente Cartas, y yo mismo (los 3 MVPs en DirectX/XNA que estamos en España), estaremos presentes en el Hotel Auditorium de Madrid en el evento Microsoft Coding Camp – Imagina Windows Phone 7.

Si te apetece aprender cómo desarrollar videojuegos para el móvil más cool del momento, y de paso sacarte una pasta vendiendo miles y miles de copias de tus creaciones (no se garantizan resultados ;) je je….), regístrate en el evento haciendo click aqui, y vente por allí, que seguro pasaremos un muy buen rato.

¡Espero veros allí!

Gravitards game for Windows Phone 7

Gravitards is my new, upcoming title for Windows Phone 7.

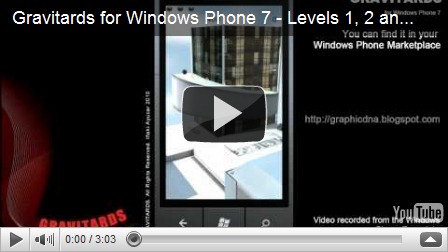
It was first introduced by Microsoft in the last TechEd Europe 2010 (in Berlin), and will be released very soon. In the meantime, you can see a couple of work in progress videos here:


Sounds are still temporary (borrowed from an ancient game), and will be replaced in the first release.

Hope you like it!

Cheers

Windows Blocks published in the Windows Phone 7 MarketPlace

  Yesterday, we published our first game for Windows Phone 7.

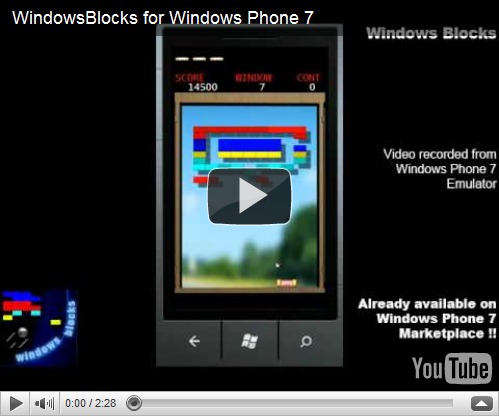
Captura5<<Windows Blocks brings the classic brick-breaker experience to the Windows Phone 7. With tens of different levels, with progressing difficulty, you will be able to check your skills breaking the bricks that block the views of your house, window by window. Test yourself controlling the magnetic platform with your device's accelerometer (other input methods available too), and learn to use all the Power Pills that can be hidden behind the bricks, to help you out with your duty. Go, break'em all ! >>

You can download a trial version from the MarketPlace and buy it if you like it. In the following days, we´ll publish our second game, the first in 3D.

Comments are welcome!

Other Pictures:


Captura7 Captura10  Captura11  Captura12  Instructions