Mostrando entradas con la etiqueta SlimDX. Mostrar todas las entradas

DirectX Control Panel and D3D Debug Output in D3D 9.x/10.x/11.x for Windows 7, 8 and 8.1

Debugging D3D applications can be a pain, but it´s completely necessary sometimes if you want to know what´s going on in your D3D application (error codes don´t give much information without the debug output).
However, things have changed quite a bit recently in the latest versions of Windows (8.1), Visual Studio (2013) and DirectX (11.2). The following video explains some of the changes related to D3D Debugging, the DirectX Control Panel, and how all the new infrastructure works:

You can also access the content in the form of slides.
Keep in mind that some of the DirectX features are no longer distributed with the DirectX SDK, but with the Windows SDK. So, we will try to cover all the possible cases you could face when trying to activate the Debug Output in D3D, no matter if you work in Windows 7 with the old version of DirectX SDK (June 2010), if you are in Windows 7 or Windows 8 and use the new Windows SDK, or if you are in the latest Windows 8.1 with its own Windows SDK.

The New DirectX Control Panel

We will need to deal with it to enable D3D debug and to manage other stuff, so first thing is to learn to differentiate between the old one (June 2010 DirectX SDK) and the new ones (Windows SDK). It´s easy: the new ones only include one tab (Direct3D 10.x/11.x):
Old Control Panel (DirectX SDK June 2010)
New DX Control Panel (Windows SDK)
image image
Location:
C:\Program Files (x86)\Microsoft DirectX SDK (June 2010)\Utilities\bin\x64 (or x86)
Location:
C:\Windows\System32

So, if you are developing for D3D 10.x or 11.x, use the new one as the old one won´t have any effect. If you are still using D3D9 and the old DX SDK 2010, grab the one on your left.
Note: See the above video to learn about new features in the panel like the “Feature level limit”.
Windows 7

D3D 9.x

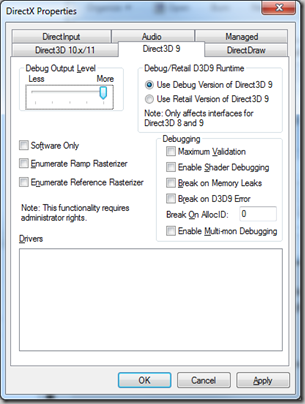
If you are still developing with D3D9, honestly you should seriously consider moving forward. But if you can´t, and you need to enable debug in your app, you just need to use the OLD Control Panel described above, and navigate to the Direct3D 9 tab to make sure you select “Use Debug Version of Direct3D 9”, and turn the Debug Output Level to “More”, just like depicted in the following image:
image
That should force your DirectX applications to use the Debug version of the DirectX libraries, so you should immediately start to see debug output in Visual Studio.
Managed D3D9 applications (SlimDX, SharpDX and similar wrappers)

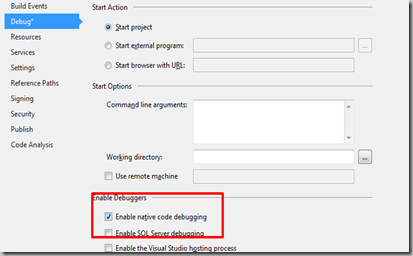
If you are developing in C#, keep in mind that you will also need to activate the flag “Enable native code debugging” under the Debug tab of your main project properties in Visual Studio. If not, the native debug output cannot get through to the output window.
image

D3D 10.x / 11.x

Important None: The necessary components for debugging D3D 10.x and 11.x are no longer installed with the old DirectX SDK (June 2010). In order to have them you need to install the Windows 8 SDK (even if you are in Win7). If you don´t have the necessary components, the creation of the device with the "debug" flag will fail (see below for more info). One easy way to check if you have the components is to check the existance of the NEW DX Control Panel, in C:\Windows\System32.

Activating the debug output in D3D 10.x / 11.x is a bit different, as settings are handled per application (you need to add your exe to a list in the control panel, and set an specific configuration for it in there). To do so, please follow these steps:
  1. 1.- Open the NEW DirectX Control Panel and navigate to the Direct3D 10.x / 11 tab
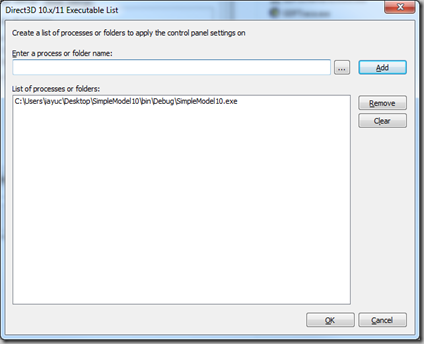
  2. 2.- Click on “Edit List” to add your exe to the list of applications controlled by the DX panel
  3. 3.- In the window that will pop up (below), click on the dots “…” and navigate to your exe file. Then click “Ok”.
image
  1. 4.- Back in the main tab, choose the configuration you want (probably want to set “Force On” to force debug output), and mute all the message types you don´t want to see (if any)
Once your exe is on the list of apps the Control Panel manages, next step is to make sure your D3D device connects to the Debug Layer of DirectX.
You can find more info here, but basically what you need to do is create your Device with Creation Flags including the D3D11_CREATE_DEVICE_DEBUG flag.

Managed D3D 10.x /11.x applications (SlimDX, SharpDX and similar wrappers)

Just like with D3D 9, when developing in C# you should remember to activate the flag “Enable native code debugging” under the Debug tab of your main project properties in Visual Studio. If not, the native debug output cannot get through to the output window (see above in this post for more info).

Windows 8.x + Windows SDK

This part covers the case when working in Windows 8.x with the newer versions of the Windows SDK.

D3D 9.x

Debugging D3D 9 applications in Windows 8 should work exactly the same as we did in Windows 7. Of course, the new Windows SDK doesn’t include tools to configure D3D9, so you should install the June 2010 DX SDK to get access to the OLD control panel. I couldn’t make sure this works as all my machines are updated to Windows 8.1, so any feedback here will be really welcome.
What I can tell you is that, unfortunately, D3D9 debugging seems to be disabled in Windows 8.1. If you open the OLD DX Control Panel, you will see that all the debug parts of the D3D 9 tab are grayed out. I tried by all means to bring it back with no luck, so if you manage to enable it, please let me know.

D3D 10.x / 11.x

Enabling debug output for D3D 10.x and 11.x is pretty much the same as in the case of Windows 7, unless this time you will need to use the NEW version of the DX Control Panel, located in C:\Windows\System32 instead of the usual DXSDK folders.
Also, remember to create your devices specifying the D3D11_CREATE_DEVICE_DEBUG creation flag (as described above), and in the case of developing in C#, remember to activate the “Enable native code debugging” option in your main project.

Troubleshooting

  • The application works but I get no debug output: If you are in D3D9, make sure you activated the Debug libraries in the old DX Control Panel. Also, if you work in C#, ensure to activate the “Enable native code debugging” option. If you work in D3D 10/11, make sure you created the device with the D3D11_CREATE_DEVICE_DEBUG flag, and don´t forget to add your app to the list of programs managed by the DX Control Panel. In all cases, always use the appropriate DX Control Panel (see above to learn about this).
  • In D3D 10.x / 11.x, the application fails while trying to create the device with the DEBUG creation flag: This usually happens if you don´t have the correct SDK installed. If you are in Windows 7 or in Windows 8, make sure you install the Windows 8 SDK. If you are in the latest Windows 8.1 you should install its own Windows 8.1 SDK, as it´s not compatible with the 8.0 SDK version. One easy way to check if you have the components is to check the existance of the NEW DX Control Panel, in C:\Windows\System32.

Projecting a 3D Vector to 2D screen space, with automatic viewport clipping (DirectX, SlimDX or XNA)

Many times, you will need to know the 2D screen coordinates of a 3D world position. DirectX already includes methods to perform vector projections, taking into account the needed World, View and Projection matrices, as well as the viewport scaling. It does not include however viewport clipping, as an additional feature in those methods.

Viewport clipping can be a tricky matter, and sometimes, you will need to rely on algorithms like the Sutherland-Hodgman algorithm, or the refined version specifically developed for 2D viewports: the Cohen-Sutherland algorithm. Those methods are especially appropriate when you are already dealing with 2D coordinates, or if you need to know the extra points or polygons generated when clipping is performed.

In our case however, we will only focus on finding the closest in-screen coordinates that correspond to an off-screen point, without dealing with any extra geometry or polygon sub-division. It’s important to note also that we will be working with 3D coordinates that go through a projection process (and finally getting 2D coords). This is relevant, as provides us with additional information we can use, and allows us to jump inside the algorithm and perform the clipping in the middle of the projection pipeline, instead of doing so at the end, when the coordinates are already 2D.

Resources like this, and this explain very well the processing of vertices in the Direct3D pipeline:

untitled

As you can see, each 3D position travels through different stages and spaces of coordinates: model space –> world space -> camera space –> projection space –> clipping space –> homogeneous space –> and finally: Screen Space.

Evidently, D3D also performs certain types of clipping to vectors, and you can tell by the above picture that clipping is done, (surprisingly), in clip space. We will try to mimic that behavior…

Note: Transforming coordinates with the MClip matrix, to go from projection space to clip space should be done only if you want to scale or shift your clipping volume. If you are ok with a clipping volume that matches your screen render target viewport (you will, most of the cases), you should leave this matrix as the Identity, or simply don´t perform this step. The below written algorithm has all this step commented.

Once our coordinates are in Clip Space (Xp, Yp, Zp, Wp), we easily perform the clipping by limiting their values to the range: –Wp .. Wp for the X and Y, and to the range: 0 .. Wp for Z.

After that, we just need to proceed with the normal Vector projection algorithm, as the resulting 2D coordinates will be stuck inside the screen viewport. An extra feature that should be nice to have, is a simple output variable that tells us if the coordinates were inside or outside the viewport.

A C# implementation of such an algorithm could be:

public static Vector2 ProjectAndClipToViewport(Vector3 pVector, float pX, float pY,
                                float pWidth, float pHeight, float pMinZ, float pMaxZ,
                                Matrix pWorldViewProjection, out bool pWasInsideScreen)
        {
            // First, multiply by worldViewProj, to get the coordinates in projection space
            Vector4 vProjected = Vector4.Zero;
            Vector4.Transform(ref pVector, ref pWorldViewProjection, out vProjected);

            // Secondly (OPTIONAL STEP), multiply by the clipMatrix, if you want to scale
            // or shift the clip volume. If not (most of the times you won´t), just leave 
            // this part commented,

            // or set an Identity Matrix as the clip matrix. The default clip volume parameters
            // (see below), will produce an identity clip matrix.

            //float clipWidth = 2;
            //float clipHeight = 2;
            //float clipX = -1;
            //float clipY = 1;
            //float clipMinZ = 0;
            //float clipMaxZ = 1;
            //Matrix mclip = new Matrix();
            //mclip.M11 = 2f / clipWidth;
            //mclip.M12 = 0f;
            //mclip.M13 = 0f;
            //mclip.M14 = 0f;
            //mclip.M21 = 0f;
            //mclip.M22 = 2f / clipHeight;
            //mclip.M23 = 0f;
            //mclip.M24 = 0f;
            //mclip.M31 = 0f;
            //mclip.M32 = 0;
            //mclip.M33 = 1f / (clipMaxZ - clipMinZ);
            //mclip.M34 = 0f;
            //mclip.M41 = -1 -2 * (clipX / clipWidth);
            //mclip.M42 = 1 - 2 * (clipY / clipHeight);
            //mclip.M43 = -clipMinZ / (clipMaxZ - clipMinZ);
            //mclip.M44 = 1f;
            //vProjected = Vector4.Transform(vProjected, mclip);
            
            // Third: Once we have coordinates in clip space, perform the clipping,
            // to leave the coordinates inside the screen. The clip volume is defined by:

            //
            //  -Wp < Xp <= Wp
            //  -Wp < Yp <= Wp
            //  0 < Zp <= Wp
            //
            // If any clipping is needed, then the point was out of the screen.
            pWasInsideScreen = true;
            if (vProjected.X < -vProjected.W)
            {
                vProjected.X = -vProjected.W;
                pWasInsideScreen = false;
            }
            if (vProjected.X > vProjected.W)
            {
                vProjected.X = vProjected.W;
                pWasInsideScreen = false;
            }
            if (vProjected.Y < -vProjected.W)
            {
                vProjected.Y = -vProjected.W;
                pWasInsideScreen = false;
            }
            if (vProjected.Y > vProjected.W)
            {
                vProjected.Y = vProjected.W;
                pWasInsideScreen = false;
            }
            if (vProjected.Z < 0)
            {
                vProjected.Z = 0;
                pWasInsideScreen = false;
            }
            if (vProjected.Z > vProjected.W)
            {
                vProjected.Z = vProjected.W;
                pWasInsideScreen = false;
            }

            // Fourth step: Divide by w, to move from homogeneous coordinates to 3D
            // coordinates again

            vProjected.X = vProjected.X / vProjected.W;
            vProjected.Y = vProjected.Y / vProjected.W;
            vProjected.Z = vProjected.Z / vProjected.W;

            // Last step: Perform the viewport scaling, to get the appropiate coordinates
            // inside the viewport

            vProjected.X = ((float)(((vProjected.X + 1.0) * 0.5) * pWidth)) + pX;
            vProjected.Y = ((float)(((1.0 - vProjected.Y) * 0.5) * pHeight)) + pY;
            vProjected.Z = (vProjected.Z * (pMaxZ - pMinZ)) + pMinZ;

            // Return pixel coordinates as 2D (change this to 3D if you need Z)
            return new Vector2(vProjected.X, vProjected.Y);
        }

Hope it helps !

Sonrisa

Properly calculating the diffuse contribution of lights in HLSL Shaders

It’s been many years since Vertex and Pixel Shaders came out, and several years too since the Fixed Pipeline is deprecated, but there are still many questions in the forums out there asking about how to properly calculate the diffuse contribution of Lights. This paper has a great tutorial about the issue, and includes a whole Shader that mimics the Fixed Pipeline behavior. However, we will see here how to perform just the basic calculations, just in case you don’t need to emulate the full pipeline.
First thing is to write some D3D9 code that allows you to switch from the old Fixed Pipeline and your own Shaders, using the same parameters. Doing so, you will easily find any behavior differences in light calculations. You can read more about how D3D9 Fixed Pipeline calculates lighting in this page.
When writing shaders, people tend to calculate the diffuse contribution like:
Out.Color = (materialAmbient * lightAmbient) + (materialDiffuse * lightDiffuse * dot(Normal, L));
Where L is the vector from the vertex position (in world coordinates) to the light.
Apart from not doing any specular or emissive calculations (which could not be necessary in many cases, depending on your scenario), there are several mistakes in that approach:
1.- You don’t want the dot to return negative values, because it will black out colors wrongly. So, you need to clamp it to the 0..1 range, using the saturate operator: saturate(dot(Normal, L))
2.- In order to get the same results as the Fixed Pipeline, you should include Attenuation calculations, because they modify the intensity of light with the distance between the point being lit and the light source. Attenuation (as opposed to what its name suggests), not only attenuates light, but also can increase intensity in some circumstances. (See below how to properly calculate attenuation factors)
3.- Once you are calculating attenuation, you should remove the materialDiffuse factor from the previous equation, as you don’t want it to be attenuated too. You will apply it later, when the entire lighting contribution is properly calculated and attenuated.
Keeping those 3 things in mind, the final calculation in a vertex shader would be:
    float4 LightContrib = (0.f, 0.f, 0.f, 0.f);
    float fAtten = 1.f;

    // 1.- First, we store the total ambient light in the scene (multiplication of material_ambient, light_ambient, and any other global ambient component)
    Out.Color = mMaterialAmbient * mLightAmbient;

    // 2.- Calculate vector from point to Light (both normalized and not-normalized versions, as we might need to calculate its length later)
    float pointToLightDif = mLightPos - P;
    float3 pointToLightNormalized = normalize(pointToLightDif);
    
    // 3.- Calculate dot product between world_normal and pointToLightNormalized
    float NDotL = dot(Nw, pointToLightNormalized);        
    if(NDotL > 0)
    {
        LightContrib = mLightDiffuse * NDotL * mLightDivider;     
            
        float LD = length(pointToLightDif);        
        if(LD > mLightRange)
            fAtten = 0.f;
        else
            fAtten = 1.f/(mLightAtt0 + mLightAtt1*LD + mLightAtt2*LD*LD);
        
        LightContrib *= fAtten;
    }
    Out.Color += LightContrib * mMaterialColor;
    Out.Color = saturate(Out.Color);


Comparison

First image is the Programmable version. You can slightly tell it by the reflections on the windows.
image
Second image is the Fixed Pipeline version (no real time reflections on windows):
image

La importancia de la codificación binaria de Shaders en DirectX o Silverlight

Si alguna vez te has topado con un Vertex o Pixel Shader que al menos en apariencia es correcto, pero que sin embargo produce errores al compilar, ten en cuenta que la codificación utilizada para salvar el texto afecta.

Como ya sabrƔs, por mucho que un archivo contenga texto, en el disco duro de tu ordenador se almacena como datos binarios. Y para ello, es necesario escoger uno de los muchos mƩtodos existentes para transformar el texto a binario, y vice-versa.

Si abrimos un archivo de texto con una herramienta de anÔlisis Hexadecimal, como HxD, podremos observar que los primeros bytes del mismo determinan su codificación. Por ejemplo, la siguiente ilustración muestra un fichero con la cabecera EF BB BF, que determina que el fichero utiliza codificación UTF-8 (la codificación por defecto en Visual Studio).

image

Podéis encontrar mÔs información sobre cabeceras de archivos de texto aqui.

Lamentablemente, el compilador de Shaders de DirectX solo admite determinados tipos de codificación, y UTF-8 no estÔ entre ellos. Por eso, por mucho que el código de ese shader sea correcto, si tratamos de compilarlo recibiremos el siguiente error (u otros, dependiendo del entorno en el que nos encontremos):

“X3000: Illegal character in shader file“

Si esto sucede, solo tenemos que cambiar la codificación con la que se salva el archivo a disco, utilizando una sencilla opción de Visual Studio (Archivo->Opciones avanzadas de Salvado):

image

Aqui, podremos escoger quĆ© codificación utilizar para guardar el archivo. Por ejemplo, podemos escoger “Western European (Windows) – Codepage 1252”, que es una codificación ASCII simple, para que el compilador de shaders funcione correctamente:

image

Mas info:

http://blog.pixelingene.com/2008/07/file-encodings-matter-when-writing-pixel-shaders/

http://www.cplotts.com/2008/08/22/encodings-matter-with-fx-files/

Taking advantage of high-level C# features to make our 3D games API or platform independent

In the last few years, programming languages and development tools have evolved quite a bit. Visual Studio is a masterpiece nowadays, and things like Refactoring and Intellisense make our life much easier.
There are other cool features that can be now used in our code, and that are really appropriate to make our 3D engines API-Independent. I´m talking about Generics and Extension Methods.

What is API or platform multi-targeting?

Multi-targeting is writing a software (a game, for instance) that can run in different platforms or use different APIs. Of course, we should try to achieve this with the following constraints:
  • Avoid redundancy as much as possible (as we already saw that Duplicating is wrong).
  • If possible, introduce no performance overhead at all, or at least try to minimize it

When is multi-target necessary?


It is obviously necessary if your application is meant to be distributed for different platforms (XBox, PS3, PC, etc, for example). But making your software multi-target is also very recommendable in other situations, for example when you need to upgrade your technology to a newer version of an API.
For instance, imagine that DirectX11 just came out. You would like to take advantage of some new features of it, but cannot force all your clients to upgrade their graphics cards, so you still need to support DirectX10. The solution is to make your software support both DirectX10 and 11, with multi-targeting. In this article, we will use the case of targeting an application to two different render APIs: SlimDX and XNA.
If you already faced this problem before, you know it can be a serious one, especially if your software was not designed to support multi-targeting from the beginning, and you have API calls scattered all around your code. How do we make the change without needing to re-write the entire software from scratch?
Let’s explore the possibilities:

A macro-C++ approach

When using languages like C++, some people make multi-targeting using Macros:
  • Write all your game-logic code using your own MACRO-named types like: myMatrix4x4, myTexture, etc.
  • Write a header file for each platform, in which all that macros are declared:
#define myVector3 Microsoft::Xna::Framework::Vector3
#define myMatrix4x4 Microsoft::Xna::Framework::Matrix
But remember, MACROS ARE THE SOURCE OF ALL EVIL IN THE WORLD.
Macros easily grow in complexity. Specially if you start making multi-level macro calls. They make debugging and understanding the software a hell on Earth, and are extremely bug-prone, if you are not very careful. They have even been removed from modern languages like C#. So I totally discourage you to use this solution.
  • Pros:
      • Everything arranged for each platform at compilation: no performance penalty.
      • No design effort. Easy development
      • Resolved at compilation: no performance overhead
  • Cons:
      • Make debugging, tracing and maintenance of the software in general a hell in Earth
      • Very bug-prone
      • Not available in modern languages, like C#
      • In my opinion it’s against good practices in software. At least as long as a better solution exists.
      • Compilation of C++ projects which massively use macros can take years to complete, especially if macros are recursive
      • They don´t do the job for every case

The conditional compilation approach

As we have already seen, some parts of your code must be different for each platform, so an obvious and easy way to make your software multi-target is using conditional compilation.
This approach is supported in almost every language, and works by defining compilation constants in your project like: PLATFORM_XNA, or PLATFORM_SLIMDX. Then, each time you find an API-dependent code part, you do something like:
#if(PLATFORM_XNA)
...
#else
...
#endif

  • Pros:
      • Everything arranged for each platform at compilation: no performance penalty.
      • No design effort. Easy development
      • Available in all languages
  • Cons:
      • Ugly and un-elegant code
      • Uncomfortable to understand and trace
      • Your code will grow considerably (too much redundancy)
      • In my opinion it’s against good practices in software. At least as long as a better solution exists.

The layered approach

This is one of the usual approaches. It is related to software engineering more than to an specific language, and involves all the stages of development, since conception and first designs, to the final coding.
What it suggests is dividing your application in “layers”, keeping internal layers for the game-logic related issues, which do not depend on the API or platform at all, and making an external layer that will give output to all that logic, through the API. This way, when you need to target a different platform, only the external layer has to be rewritten.
This external layer, usually deals with things like Rendering, that’s why it’s very typical to find games out there with DLLs like: RendererDX9.dll, RendererDX10.dll, etc.
  • Pros:
      • Elegant
      • Easy to understand, trace and debug
      • Robust, not too bug-prone
      • Available in all languages
  • Cons:
      • It requires a big design effort
      • It can introduce a bit of performance overhead
      • It introduces redundancy of code and information, as some game states has to be stored in several layers
      • It’s sometimes not a feasible solution if the project is already written (the multi-target was not planned from the beginning), as it implies big structural changes.
      • Following this design will give your software a Library or API looking I personally don’t like, as it breaks a bit the consistency of classes, by separating tasks that conceptually should belong to a class into other assemblies. This is one of the points I personally disagree more of this approach. I prefer to keep this consistency, leaving all tasks related to an object inside it’s class. Just an example to show this:
You will end up with lines of code like:
RendererDX9.RenderModel(this);
Instead of the traditional:
this.Render();
Some people would say that rendering an object is not a task naturally belonging to that object. Well, as I said, this is a matter of personal preference, and I prefer the second approach. That’s why in next chapter we will try to make a multi-target system that follows it.

The inheritance approach

This approach is elegant as well (as the previous one). It also related to engineering and planning more to an specific language, and also involves many stages of the development.
Instead of dividing your software in layers, it relies mostly on Inheritance, through a very basic design for classes that are API-Dependant like the next example:
            • Model3DBase
                  • Model3DSlimDX
                  • Model3DXNA
It is quite obvious that we will put in the base class all the non API-dependent code, and the rest in the child classes. For example, the ToString() method has nothing to do with the platform the 3D model will be rendered in. So that code will be in the base class, avoiding rewriting it for each child.
Once we have all the classes divided for each version of the API, in the outer part of your software you just need to choose which kind of Scene to use. Something like: SceneSlimDX or SceneXNA.
This approach works, it’s elegant, easy to understand and trace, and keeps the consistency of classes, but it has a major drawback: for classes like this (a 3D Model), many many member variables and methods will be API-specific, so the amount of code in the base class will be much lower than in the child, dependent classes. This will force you to write a huge amount of duplicated code, and we already said that duplicating is wrong.
  • Pros:
      • Elegant
      • Easy to understand, trace and debug
      • Robust, not too bug-prone
      • Available in all languages
      • It keeps the consistency of classes, allowing us to put the Render method inside the Model3D class, instead of having to take it out to another class.
  • Cons:
    • It requires some design effort
    • It’s sometimes not a feasible solution if the project is already written (the multi-target was not planned from the beginning), as it implies big structural changes.
    • Splitting your types for each API won´t help reducing redundancy in higher code levels too (what will happen when we are going to use the model? which version will be use? Again conditional compilation?)
    • The biggest problem is the redundancy of code mentioned (many code parts will be repeated in the child classes)

So, which one is best?

Again, this is all a matter of personal preference.
Macros are discarded by themselves… too bug-prone, and not present in modern languages. In my opinion, best option is a combination of: a little bit of conditional compilation (in very few cases), and in some cases a bit of layered design too. But whatever we choose, all of them have the same problem: code redundancy.
If only we could reduce that code redundancy…

C# comes to save the day

.Net has been introducing improvements to software development since it’s conception. It saves you time. It saves you money. It saves you headaches. It saves you stress. In my opinion, that’s precisely the strong selling point of .Net.
Microsoft has succeeded in making programmers’ life easier, with no renounce to performance, efficiency or robustness
In the latest releases, .Net is going even further, introducing new ways of development that can, not only make your life easier, but also offer you the possibility to face old problems in new ways. This case is just an example.

Extension Methods

Many times, APIs are similar to each other. You will have textures, you will have 3D models, you will have vertices and faces. Even rendering methods will be probably similar. And it´s a pain having to add conditional compilation just for something like finding the number of vertices in a 3D model mesh:
#if(RENDER_XNA)
            int vertexCount = mMesh.NumVertices;
#elif(RENDER_SlimDX9)
            int vertexCount = mMesh.VertexCount;
#endif
Both XNA and SlimDX offer that information, but the name of the property changes. There are many many cases like this where code changes are just semantics, or just re-arranging stuff. And it´s a pity to add redundancy all around your code for such a simple thing.
We of course can put a “GetVertexCount” method or a “VertexCount” property in our Model3D class, but… What happens when we are working with simple Meshes (no access to our own Model3D type)? Conditional compilation again?
Not yet… Because Extension Methods can help here…

What are Extension Methods?

Extension Methods enable you to "add" methods to existing types without creating a new derived type, recompiling, or otherwise modifying the original type.
So, we can take the type "SlimDX.Direct3D9.Mesh”, or “Microsoft.Xna.Framework.Graphics.ModelMeshPart”, and add a method to it. Just like if we could modify its code.
This way, we are allowed to unify or standardize the interfaces of API-dependent types, to drastically reduce the need for conditional compilation, and therefore code redundancy.

How do they work?

Following what´s explained here, we can easily code the “GetVertexCount” method like this:
public static int GetVertexCount(this Microsoft.Xna.Framework.Graphics.ModelMeshPart pMesh)
{
     return pMesh.NumVertices;
}
 
public static int GetVertexCount(this SlimDX.Direct3D9.Mesh pMesh)
{
     return pMesh.VertexCount;
}
Note: You just need to add that method to a static class in your DLL that holds Extension Methods.
Having this, both XNA´s ModelMeshPart and SlimDX´s Mesh will offer the GetVertexCount method. With the exact same interface. So, any part of our code that wants to have this information won´t need to add conditional compilation nor redundancy anymore.
We can do similar stuff with many many differences between APIs: properties renamed or relocated, methods with different or re-arranged parameters, or even creating methods that exist in one API and not in the other.
The objective is to unify the interfaces of both APIs as much as possible.

What about performance?

We are adding a call to a method where there wasn’t any. So, in theory, we are adding a performance overhead. But here is where the Visual Studio compiler comes to help.
As you already know, there is a thing called Inlining that will help here. When your code is compiled, the compiler will replace any call to the GetVertexCount method with it´s real inner code. So no performance overhead is really added.
However, you should take care with Inlining, as there are several conditions for this to happen:
  • Methods that are greater than 32 bytes of IL will not be inlined.
  • Virtual functions are not inlined.
  • Methods that have complex flow control will not be in-lined. Complex flow control is any flow control other than if/then/else; in this case, switch or while.
  • Methods that contain exception-handling blocks are not inlined, though methods that throw exceptions are still candidates for inlining.
  • If any of the method’s formal arguments are structs, the method will not be inlined.
More info on Inlining: here, and here and here.

C# comes to save the day (II)

Generics

Since 2.0, .Net introduced Generics, a way to work with variables without specifying what type they are. This is especially useful for cases where the type of those variables is irrelevant. One of the direct and most useful examples that soon appeared is Generic Collections. The logic behind a List or Dictionary of things is the same, no matter what that “things” are.

How can Generics help out here?

Generics introduce two clear advantages:
  • Generics are resolved at compilation, so no performance overhead is introduced at all. In fact, Generics can imply some performance advantages, in certain cases. Read this article (Generics implementation chapter) for more information.
  • Generics will again dramatically reduce the Duplication and redundancy of information and code in our projects.

Reducing duplication even more, with generics

Apart from using Extension Methods, as we have seen in the previous chapter, we can reduce Conditional Compilation and code redundancy even more, with the use of Generics.
Many times, some parts of our code need to add conditional compilation just because types used are different on each API, but the operations performed on them don´t need to know what type they actually are. For instance, if we create a Material class, it will probably hold a list of textures, and the Texture type is API-dependent. Will we need to add conditional compilation every time we want handle that list of textures? Probably not.
Making the Material class to be generic, will allow us to work with Textures, without knowing if they actually are SlimDX or XNA textures:
public class Material<T_Texture>
{
     protected List<T_Texture> mTextures;
}

That reduces redundancy in the Material class, as any management of the List of textures can be done without knowing the type: adding or removing textures, accessing to them, etc.

What if we still need to perform an API-dependent operation in a generic class?

Sometimes, your classes won´t be purely generic, and still will need to perform some operations that are API-specific. In those cases, you can always check what the type of the generic T_Texture actually is.
Just like in the following example, where the generic type is checked to return one type of value or another:
 public static T GetRenderState<T>(this Microsoft.DirectX.Direct3D.Device pSrc, RenderState pState)           
        {
            if (typeof(T) == typeof(int))
                return (T)Convert.ChangeType(pSrc.GetRenderStateInt32((RenderStates)pState), typeof(T));
            else if (typeof(T) == typeof(float))
                return (T)Convert.ChangeType(pSrc.GetRenderStateSingle((RenderStates)pState), typeof(T));
            else if (typeof(T) == typeof(bool))
                return (T)Convert.ChangeType(pSrc.GetRenderStateBoolean((RenderStates)pState), typeof(T));
            else throw new System.ApplicationException("Generic Type invalid");
        }

Using the generic (Material) class

When the Material class is finished, we will probably want to use it in a Model3D class. We just need to do something like:
public class Model3D
{
    #if(RENDER_XNA)
         protected Material<Microsoft.Xna.Framework.Graphics.Texture2D> mMaterial;
    #elif(RENDER_SlimDX9)
         protected Material<SlimDX.Direct3D9.Texture> mMaterial;
    #endif
}

This way, we remove any conditional compilation or code redundancy from the Material class, and add it just a couple of times when declaring and instantiating the mMaterial variable.

Going even further with conditional #using statements

This is pretty obvious, but anyway it might help someone.
Many times, types have the same names in several APIs. For instance, the type VertexBuffer exists in: XNA, in SlimDX and in Managed DirectX.
For such cases, we can reduce conditional compilation and code redundancy even more, with #using statements at the beginning of each code file. Imagine we have a class XXX like the following:
public class XXX
{
    #if(RENDER_XNA)
        protected Microsoft.Xna.Framework.Graphics.VertexBuffer mVertexBuffer;
    #elif(RENDER_SlimDX9)
        protected SlimDX.Direct3D9.VertexBuffer mVertexBuffer;
    #endif
}

In that case, we are adding the conditional compilation just because the namespace of a type changes. It´s much better to add the conditional compilation just once in the #using statements, avoiding to spare them all through your code:
#if(RENDER_XNA)
    #using Microsoft.Xna.Framework.Graphics;
#elif(RENDER_SlimDX9)
    #using SlimDX.Direct3D9;
#endif

public class XXX
{
    protected VertexBuffer mVertexBuffer;
}

Using Generic’s constraints to reduce even more redundancies

We still didn’t mention other possibilities Generics have, like Constraints. Constraints are a way to tell the environment that, even when a type is Generic (like T_Texture), it meets certain constraints, like to have a constructor, or to inherit from a class or interface. Just an example:
public class Model3DBase<T_Material, T_Texture>
    where T_Material : MaterialBase<T_Texture>
{
        protected List<T_Material> mMaterials;

}
This makes an huge difference reducing duplication as now, even specifying no type for T_Material, we will be able to access all the properties and methods specified in MaterialBase.
Other examples:
Constraint Description
where T: struct The type argument must be a value type. Any value type except Nullable can be specified. See Using Nullable Types (C# Programming Guide) for more information.
where T : class The type argument must be a reference type, including any class, interface, delegate, or array type. (See note below.)
where T : new() The type argument must have a public parameterless constructor. When used in conjunction with other constraints, the new() constraint must be specified last.
where T : <base class name> The type argument must be or derive from the specified base class.
where T : <interface name> The type argument must be or implement the specified interface. Multiple interface constraints can be specified. The constraining interface can also be generic.
where T : U The type argument supplied for T must be or derive from the argument supplied for U. This is called a naked type constraint.
More on Constraints here.

Want to know more on Generics?

This magnificent article on generics will explain you more about this issue.

Conclusion

C# and .Net are offering new ways of facing old problems. This article tried to show how to take advantage of some new features like Generics and Extension Methods in a very old problem: API-independent 3D engines.
So, we took those new functionalities and combined them with old approaches of facing this issue, to come with a new, improved implementation, that has a basic objective: reduce code redundancy.
Hope you liked it.
Cheers!

Strange physics or math results since August 2009 release of SlimDX

Logo

If you use the magnificent SlimDX (something that you should definitely do), and have been experiencing strange issues with maths or physics, keep reading.

Quaternion Multiplication Issue

As you probably know, Quaternion multiplication is not commutative. This means that “a*b” is not the same than “b*a”.

It seems that XNA and D3DX implement this algorithm in exactly the opposite way, so for the operation: Multiply(Quaternion left, Quaternion right), one does left*right and the other does right*left.

Since the August 2009 release of SlimDX, they changed the way this operation was being done, as they thought they were previously doing it wrong. That’s why you might be getting strange maths or physical results if you install any version newer than March 2009.

I write this post because, believe me, this kind of errors are pretty difficult to trace (if you don’t pay the needed attention to Release Notes, as we did). In our case, we were suddenly getting erratic Rigid Body behavior, but everything else seemed to be working fine.

Of course, the first reaction was to think that some change in our code was to blame. It was obviously something related to maths, vector operations or matrices maybe, but after checking everything for some time, we saw no change related to that.

Then we realized it had something to do with the SlimDX update, so we started checking all the changes done to the library since March 2009, looking for changes in Math code. et voilĆ”: revision 1199: Quaternion multiply was backwards. That was making our rigid bodies go crazy…

We should definitely read the Release Notes of each new version better next time.

Warning

According to this issue, the SlimDX team is changing the method again (back to the old way) in the next June release. So pay attention to the change.

Cheers!